In this article
- 1What You Need
- 2Choose the Size and Work Out the Sheet
- 3Cut and Mark the Sheet
- 4How to Make the Bag, Step by Step
- 5How to Make the Bag Stronger
- 6Time, Cost and What to Expect
- 7Common Mistakes
- 8Make It Look Good: Decorating Ideas
- 9When to Order Custom Printed Paper Bags Instead
- 10Quick Checklist
- 11Ready to Move From Handmade to Branded?
To make a bag out of wrapping paper, cut one sheet to size, fold it into a tube with a glued seam, fold in the bottom flaps, glue them flat and add handles. The sheet size depends on the bag you want: a medium bag, 6 inches wide, 3 inches deep and 8 inches tall, needs a sheet about 18.5 by 10.75 inches.
This guide shows the flat-bottom bag made from one folded sheet, the classic paper bag shape. It covers materials, a size chart for small, medium and large bags, step-by-step folding, handles, and the mistakes that make a bag tear. If you want a stiffer bag built around a box or a card base, see our other guide on how to make a gift bag out of wrapping paper.
If you need the same bag in the hundreds, with your logo on it, we make printed paper bags. The last section explains when it is worth switching.
Key takeaways
- One sheet makes the whole bag. Sheet width is 2 x width + 2 x depth + 1/2 inch. Sheet height is bag height + half the depth + 1 1/4 inches.
- The folds do the work. Crease every fold sharply before you glue, and the bag will stand up on its own.
- Reinforce the top and the bottom. A folded hem and a card base are what stop a bag tearing.
- Match the size to the gift. Use the size chart below, then add a little room for tissue paper.
- Plan on 20 to 30 minutes for your first bag. It is quicker once you know the folds.
What You Need
You do not need special tools. Most of this is already in a kitchen drawer or a craft box.
- Wrapping paper. A sheet that does not tear when you fold it twice in the same place. Thin tissue-like paper tears too easily; heavier or matte paper works best.
- Scissors, a ruler and a pencil. Draw your cutting lines on the back of the paper.
- Double-sided tape or a glue stick. Tape is cleaner. White craft glue is stronger for the base but needs a minute to grip.
- A scrap of card. A piece of cereal box or a manila folder gives the bag a firm base.
- Handle material. Ribbon, twine, cord or strips of the same paper, plus a hole punch and, if you want, two small stickers or paper patches to reinforce the holes.
- A bone folder, a spoon or a ruler edge. Pressing along each fold with something hard makes a crisp crease.
Check the pattern on the paper before you cut. If it has a direction, such as stripes or a picture, make sure it runs the right way up on the finished bag.
One note on recycling: wrapping paper with foil, glitter or a plastic coating usually cannot go into paper recycling, and rules differ by town. Plain printed paper is the easiest to recycle. If sustainability matters to you, choose plain paper and cotton or paper handles.
Choose the Size and Work Out the Sheet
Start with the gift, not the paper. Decide how wide, how deep and how tall the bag must be, and add a little room for tissue paper on top. We write bag sizes as width x depth x height. The depth is the width of the side, also called the gusset.
Then use three simple formulas:
- Sheet width = 2 x width + 2 x depth + 1/2 inch for a glue tab.
- Sheet height = bag height + half the depth + 1/4 inch for the bottom flaps, plus 1 inch for the top hem.
- Base card = width x depth, trimmed 1/4 inch smaller each way so it drops in.
| Size | Bag (W x D x H) | Cut the sheet to | Good for |
|---|---|---|---|
| Small | 4 x 2 x 6 in | 12.5 x 8.25 in | Jewelry box, a candle, sweets |
| Medium | 6 x 3 x 8 in | 18.5 x 10.75 in | A book, a boxed gift, a scarf |
| Large | 10 x 4 x 13 in | 28.5 x 16.25 in | A sweater, a few boxed items |
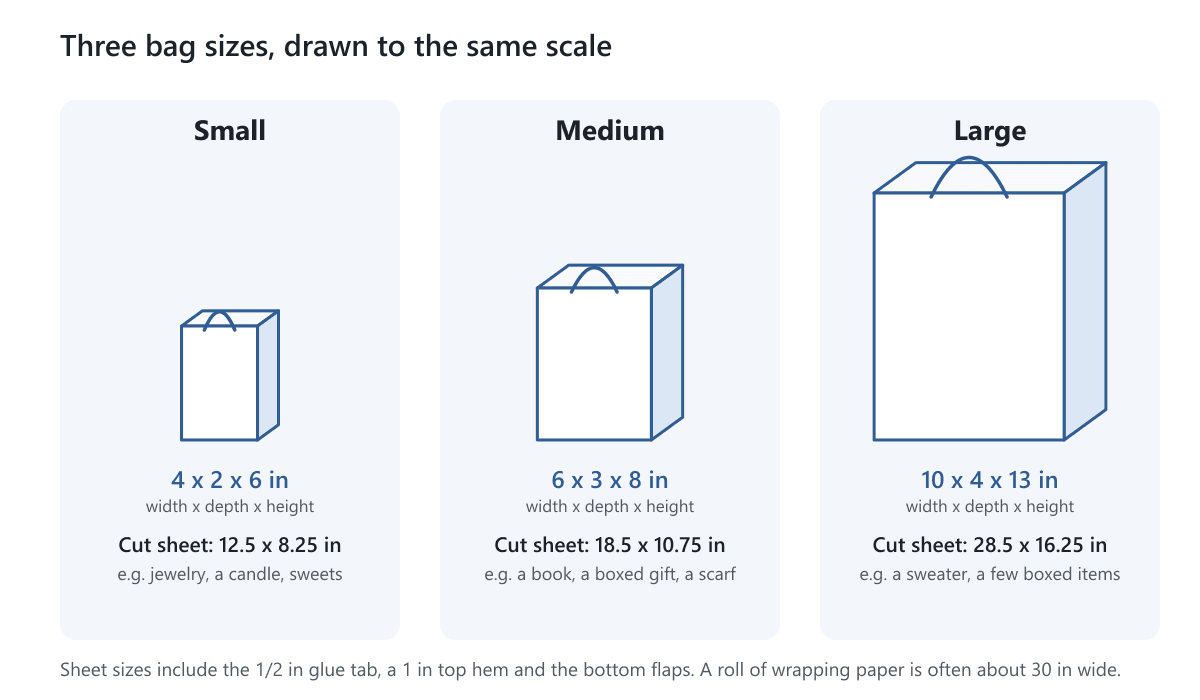
These sizes are examples. A roll of wrapping paper is often about 30 inches wide, so the large bag is close to the limit of one sheet. If your gift is bigger, use two sheets taped together on the back, or make the bag from a larger sheet of paper. Our guide to measuring the dimensions of a box explains how to measure a gift and add room for padding, and the same method works for a bag.
A Worked Example
Say you are wrapping a candle that is 3 inches across and 4 inches tall. Allow 1/2 inch of room around it and some height for tissue. A bag of 4 x 2 x 6 inches would be too narrow for the jar's base, so move up: 5 x 3 x 7 inches. The sheet is 2 x 5 + 2 x 3 + 0.5 = 16.5 inches wide, and 7 + 1.5 + 0.25 + 1 = 9.75 inches tall.
Cut and Mark the Sheet
Lay the paper pattern-side down on a flat table. Measure and draw the cutting rectangle with a pencil and ruler. Cut with sharp scissors in one long stroke per side, as ragged edges show on a plain bag.
Now mark the fold lines. Working from the left edge, mark the front, side, back and second side, then the glue tab. Then mark the two horizontal lines: the top hem line 1 inch from the top, and the line where the bottom flaps begin.
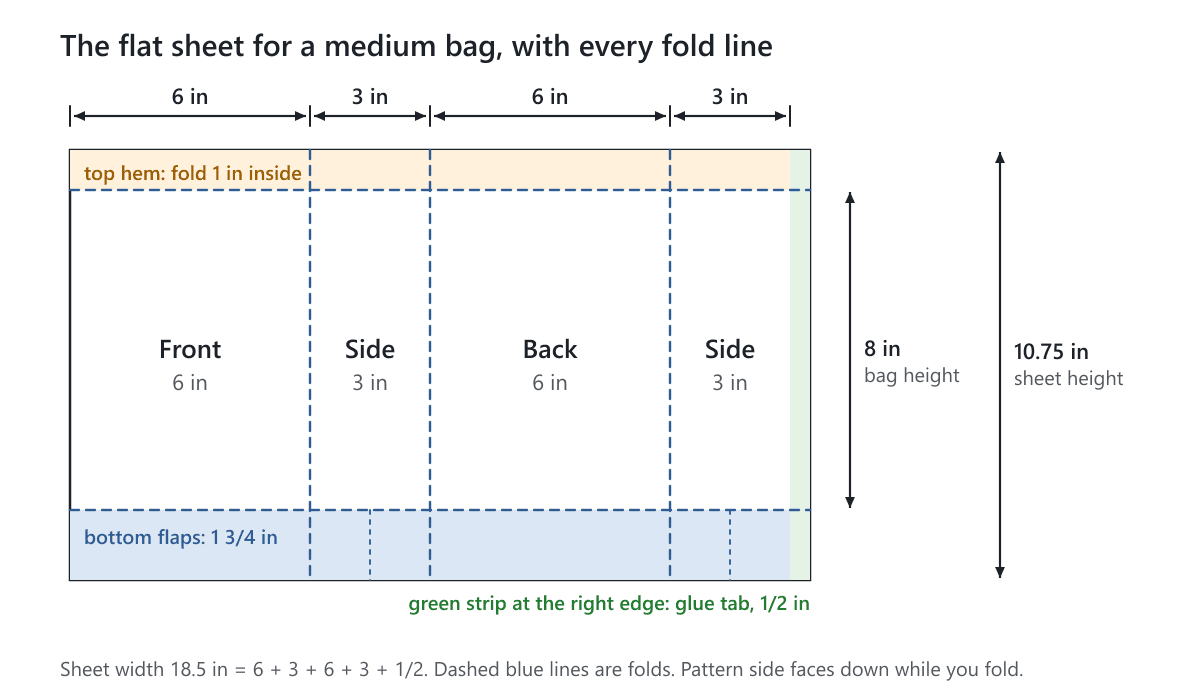
Press along every line with a ruler edge or a bone folder. Fold the paper up on its line, run your tool along the fold, then flatten it again. A sharp crease is easier to glue, and it makes the sides stand straight.
On each side panel, also crease a line straight down the middle. This is the line where the side folds in when the bag is flat, and it lets the bag fold neatly for storage.
How to Make the Bag, Step by Step
1. Fold the Top Hem
Fold the top 1 inch of the sheet down toward the back and press it flat. If you want a stronger edge, glue it. A hem makes the top edge double thick, and the handles are fixed here later.
2. Make the Tube
Stand the sheet up with the pattern outward. Bring the glue tab edge around to meet the far edge. Put double-sided tape along the tab, press it onto the back of the first panel and hold it for ten seconds. You now have a tube.
3. Fold the Side Gussets In
Flatten the tube so the two side panels fold inward along their middle creases. The bag now folds flat like a paper sack. Keep it flat for the bottom.
4. Fold the Bottom
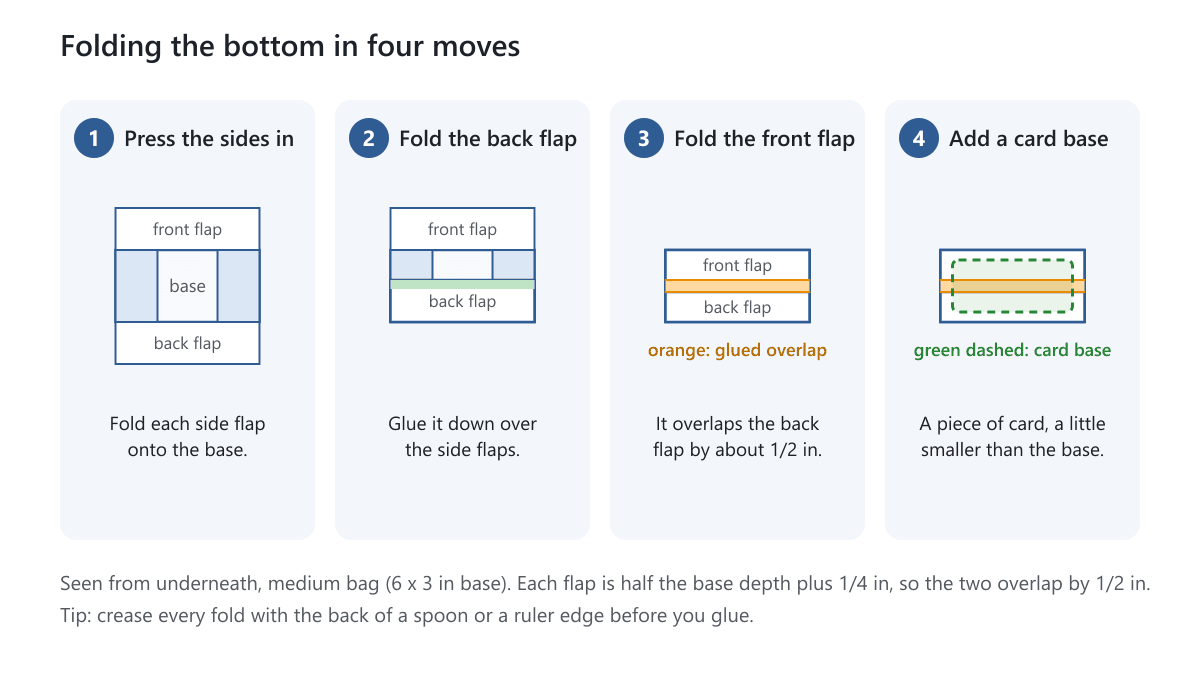
Open the bottom end and push the sides in so the flaps overlap the base area. Fold the back flap up, glue it, then fold the front flap over so the two overlap by about 1/2 inch. Press hard along the glued area.
5. Add the Card Base
Drop a piece of card into the bag so it lies flat on the base. Cut it to the width and depth of the base, a little smaller. The card spreads the weight of the gift across the whole bottom, so the glued flaps do not carry it alone.
6. Add the Handles
Punch two holes on the front and two on the back, about 1 1/2 inches in from each side and 1/2 inch below the top edge. Stick a small paper patch or a sticker on the inside of each hole first, so the paper does not tear. Thread a piece of ribbon or cord about 12 inches long through each pair of holes and tie a knot inside the bag. Larger bags need longer cord.
Another option is paper handles. Cut two strips 1 inch wide and 10 inches long, fold each in thirds and glue them inside the hem. They look neat and use no extra material.
7. Finish and Check
Open the bag and check the base, the seam and the handles. Put a book or a can of food in it, lift it by the handles, and see how it holds. Fix a weak spot now, not in front of the person you are giving it to.
How to Make the Bag Stronger
A bag from wrapping paper is a light-duty bag, and the handles tear first. These changes help, and each one takes only a few minutes.
- Double the top. A 1 inch hem is the minimum. A 1 1/2 inch hem, glued flat, is stronger.
- Reinforce each handle hole. A patch of card or two layers of tape on the inside spreads the pull.
- Use a card base. It is the single biggest improvement.
- Line the bag with a second sheet. A bag made from two layers of paper, glued together before folding, is stiffer and holds its shape.
- Use a heavier sheet. Choose paper that feels thick and does not crinkle as you fold it.
- Keep the load light and balanced. Put heavy items low and centered, and never carry the bag by the bottom.
Even a well-made bag from wrapping paper is for light gifts such as jewelry, sweets, a candle or a small boxed item. If you want a stiffer bag that can carry a little more, our guide to making a gift bag from wrapping paper builds the bag around a card or a box.
Time, Cost and What to Expect
The first bag usually takes 20 to 30 minutes, including cutting and checking. With practice, a small bag takes around 10 minutes. The cost is close to nothing if you reuse paper from a roll you already have.
Making bags by hand has limits. Every bag is slightly different, seams show, and the paper rarely carries your brand. This is fine for a birthday or a small craft stall. It becomes slow once you need dozens of matching bags.
Common Mistakes
- Cutting the sheet before measuring the gift.
- Forgetting the glue tab, so the tube cannot close.
- Skipping the creases, which gives a bag that will not stand up.
- Making the bottom flaps too short, so the flaps do not overlap.
- Punching handle holes with no reinforcement.
- Using thin tissue-like paper for something heavy.
- Gluing with a wet glue and not waiting, so the seam opens.
- Putting the pattern on the inside. Remember the printed side faces out.
Make It Look Good: Decorating Ideas
A plain bag looks better with one or two small touches, not many. Add a paper tag with a name, a ribbon bow at the handles, a strip of contrasting paper along the top, a sticker or a stamped pattern. Tissue paper adds volume and hides the gift: our guide to putting tissue paper in a gift bag shows several ways.
When to Order Custom Printed Paper Bags Instead
Handmade bags are right for one gift or a small event. Switch to printed bags when you sell products, give out many bags, or need your logo on every one.
| Need | Handmade from wrapping paper | Custom printed paper bags |
|---|---|---|
| Quantity | 1 to a handful | 500 units or more |
| Look | Hand-finished, each different | Matching bags with your logo |
| Strength | Light gifts | Printed paper stock, 200 to 300gsm, with a choice of handles |
| Time | 20 to 30 minutes each | Production takes 5 to 7 working days after approval, plus delivery |
| Size and shape | Whatever you cut | Custom sizes and handle styles |
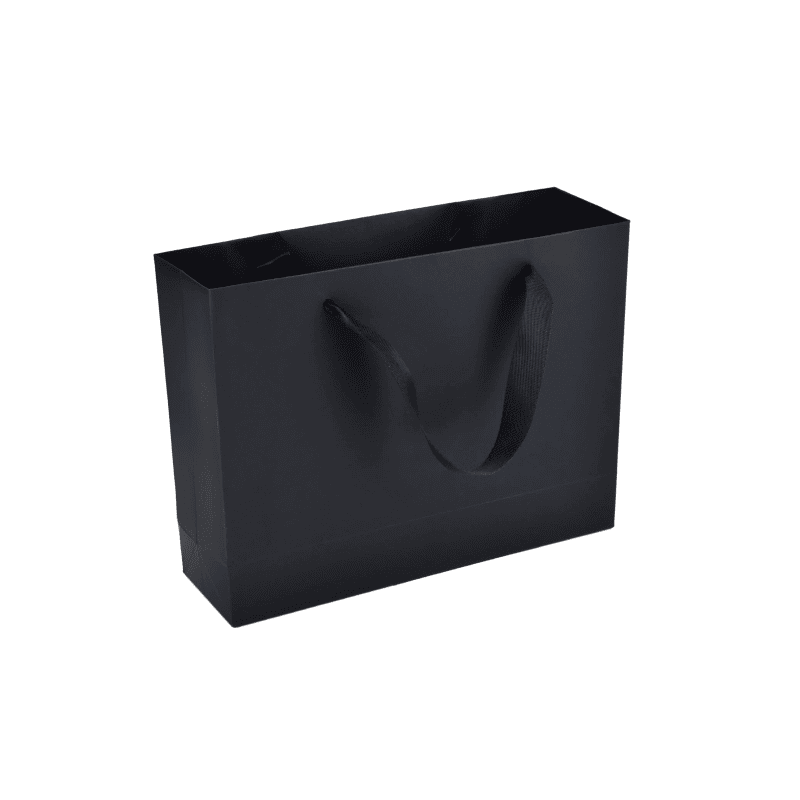
We make custom paper bags in white or brown kraft paper, in your size, with rope handles, ribbon handles, twisted paper handles, die-cut handles, flat handles, or no handles at all. The minimum is 500 units, printing is CMYK or Pantone, and finishes such as matte or soft touch are available. Free design support is included, and we confirm the artwork with you before production.
Production takes 5 to 7 working days after your artwork is approved and payment is received. Larger or more complex orders can take longer, and we confirm the date in your quote. Delivery time is added on top. Quotes include shipping to the US and Canada.
Not sure what size to order? Make one handmade bag from the size chart first. Once it fits your product well, send us its width, depth and height.
Quick Checklist
- Gift measured, size chosen (width x depth x height).
- Sheet cut using the formulas, glue tab included.
- Every fold creased before gluing.
- Top hem folded and glued.
- Bottom flaps overlap by about 1/2 inch, glued firmly.
- Card base cut and dropped in.
- Handle holes reinforced, handles knotted inside.
- Test lift with a weight before you gift it.
Ready to Move From Handmade to Branded?
Tell us the bag size, the handle style and the quantity, and we will reply within 1 business day with a quote that includes shipping. Request a free quote, or look at our sample options if you want to see materials before you decide.
Frequently Asked Questions
How big should the paper be to make a bag out of wrapping paper?
Use the formula: sheet width = 2 x bag width + 2 x bag depth + 1/2 inch, and sheet height = bag height + half the depth + 1 1/4 inches. A medium bag of 6 x 3 x 8 inches needs a sheet of about 18.5 x 10.75 inches.
What is the best wrapping paper for making bags?
Choose a thicker, matte or lightly textured paper that does not tear when you fold it twice in the same spot. Avoid thin tissue-like paper, and paper with foil, glitter or a plastic coating if you want to recycle it later.
How do you make the bottom of a paper bag flat?
Fold the bottom flaps in, with the side flaps first, then glue the back flap and fold the front flap over it. Each flap should be about half the base depth plus 1/4 inch, so the two overlap by 1/2 inch. A card base on top makes it stay flat.
How do you add handles to a wrapping paper bag?
Punch two holes at the top of the front and back, reinforce each hole with a patch or sticker inside, thread ribbon or cord through and knot it inside the bag. You can also glue folded strips of paper inside the hem.
How much weight can a wrapping paper bag hold?
It depends on the paper, the glue and the handles, so there is no fixed rating. Treat it as a light-duty bag for items such as jewelry, sweets, a candle or a small boxed gift, and test the bag with a similar weight before you use it.
Can I make a paper bag without glue?
Yes, double-sided tape works well and is cleaner. For the base, a strong tape or glue gives better results, because the base carries the weight.
When should I order custom paper bags instead of making them?
Order printed bags when you need more than a few matching bags or want your logo on them. Our paper bags start at 500 units, and you can ask us for a quote.
Written by the PacksDo Team
We make custom printed packaging, from boxes and mailers to bags, labels and inserts. Questions about this guide? Ask us.