In this article
- 1What Each Pouch Is
- 2Stand-Up vs Flat Pouches Side by Side
- 3When a Stand-Up Pouch Is the Better Choice
- 4When a Flat Pouch Is the Better Choice
- 5How to Choose in Five Questions
- 6Sizing a Pouch
- 7Print Area and Layout
- 8Examples
- 9Common Mistakes
- 10A Checklist Before You Ask for a Quote
- 11Our Pouch Options
- 12What to Do Next
Choose a stand-up pouch when the pack has to stand on a shelf, hold a larger amount and be resealed. Choose a flat pouch when the product is thin or light, sold in single portions, and the pack can hang on a peg or lie in a box. Most of the decision comes down to what is inside, how the customer uses it and where the pack is seen.
This guide explains how the two pouch types differ, when each one fits, how to size a pouch, which mistakes to avoid and what to check before you ask for a quote. If your product is a liquid or a sauce, a third type, the spout pouch, is often the better answer, and we cover it briefly below.
If you are still deciding between a pouch and a box, start with our guide to choosing the right box for your product. This article is for brands that already know a pouch is the right kind of pack.
Key takeaways
- Stand-up pouches have a folded base, so they stand upright, hold more and show a big front panel on the shelf.
- Flat pouches have no base. They suit thin, light and single-serve products such as sachets, samples, tea and spices.
- Fill a real pouch first. Measure your product at its thickest and in its real amount. Volume decides the size, not weight.
- Think about the closure. A zip lets customers reseal the pack, a tear notch makes it easy to open, and a plain seal is enough for a single use.
- Think about how it is shown. Shelf, peg, box or online photo each favor a different shape.
- Test before you commit. A sample filled with your own product shows what a drawing cannot.
What Each Pouch Is
Both types are flexible packs made from film, sealed at the edges and printed on the outside. The difference is in the shape. A few terms help before we compare them.
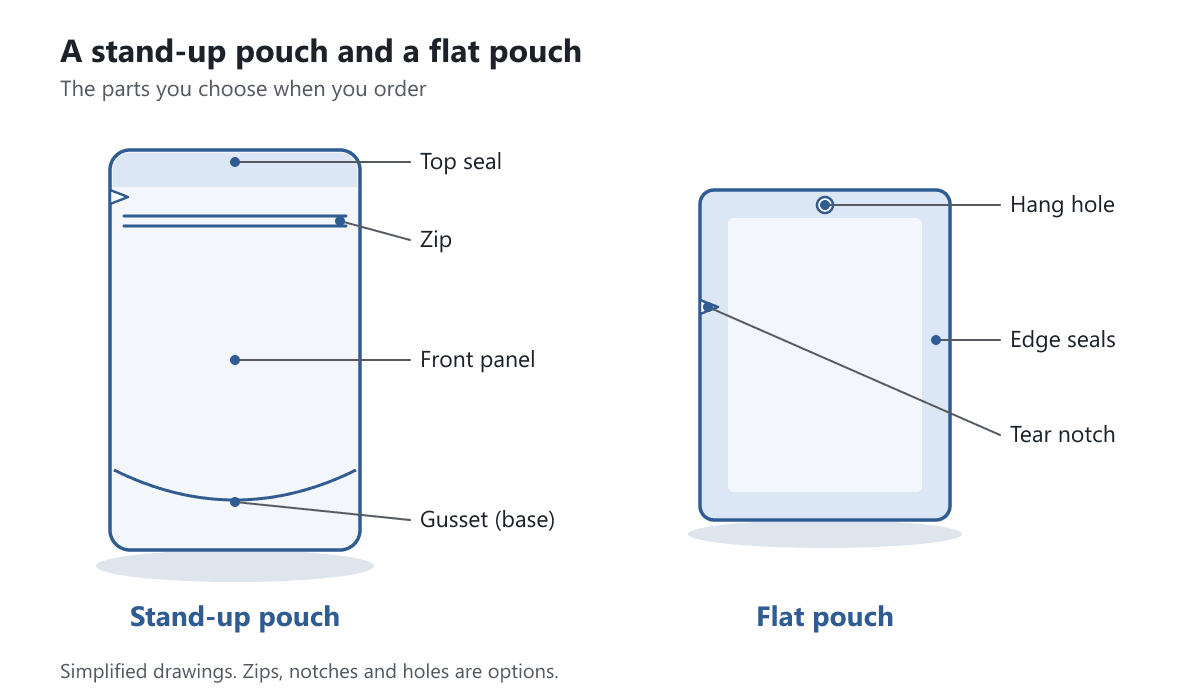
- Gusset: a fold of film at the bottom of the pouch. It opens when the pouch is filled and forms a base.
- Seal: the strip where two layers of film are joined by heat. Seals run along the edges and are not printable space.
- Zip (resealable closure): a plastic track near the top that the customer presses shut again after opening.
- Tear notch: a small cut in the seal that lets the customer tear the pouch open by hand.
- Hang hole: a hole in the top seal so the pouch can hang from a peg.
- Barrier: how well the film protects the product from air, light and moisture.
Stand-Up Pouches
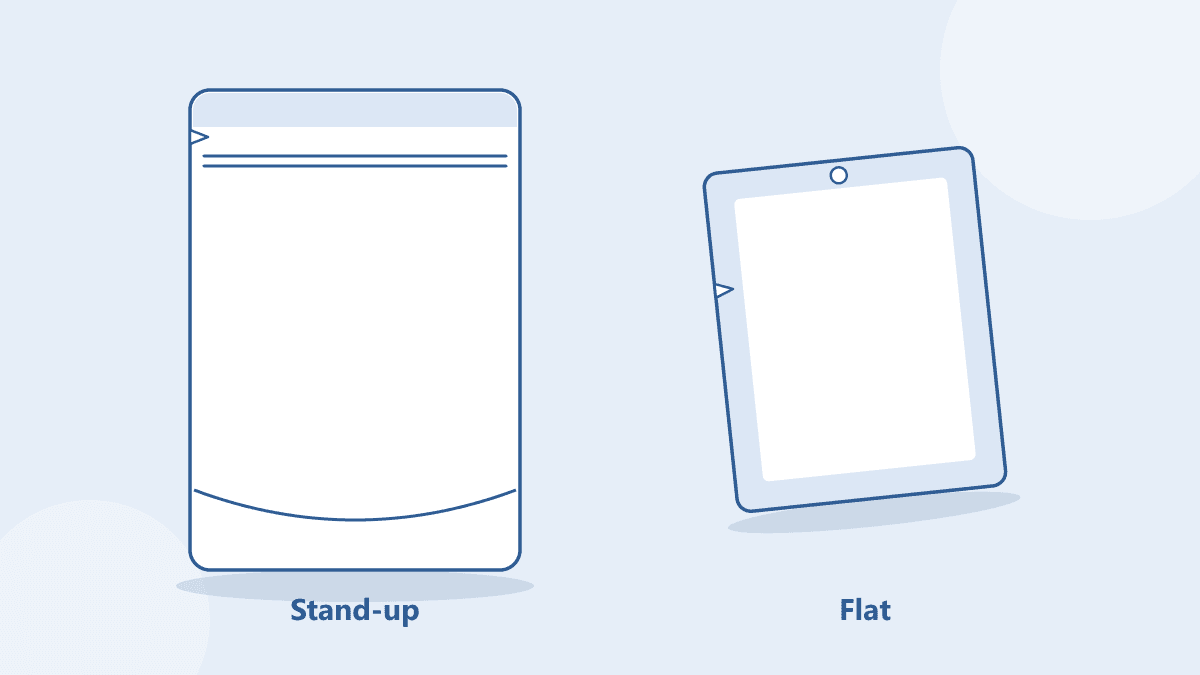
A stand-up pouch has a front panel, a back panel and a gusset at the bottom. When filled, the base spreads out and the pouch stands on its own. Because it stands, the front panel faces the customer like a small box, which is why stand-up pouches are common for coffee, granola, snacks, pet treats and dry mixes.
Flat Pouches
A flat pouch is the simplest pouch: two panels sealed along the edges to form a pocket. It has no base, so it lies down or hangs. It fills with a slight bulge in the middle, so it works best for thin, light or soft products and for single portions.
Stand-Up vs Flat Pouches Side by Side
The table below compares the points that usually decide the choice. Treat it as a starting point: your product and your sales channel can change the answer.
| Point | Stand-up pouch | Flat pouch |
|---|---|---|
| Stands on a shelf | Yes, once filled | No, it lies down or hangs |
| Typical contents | Larger amounts: coffee, granola, snacks, treats | Single portions, samples, sachets, thin items |
| Front panel | Large, faces the customer | Smaller and flatter |
| Reseal | Often with a zip | Possible with a zip, but many are sealed for one use |
| Film used | More, because of the base | Typically less |
| Shipping and storage empty | Ships flat before filling | Ships flat before filling |
| Display | Shelf, or peg with a hang hole | Peg, box, rack or counter |
| Filling | Needs a wider opening to fill upright | Simple to fill from the open top |
| Best when | The pack is the shelf display | Size, weight and cost matter most |
When a Stand-Up Pouch Is the Better Choice
Pick a stand-up pouch when most of these points are true for your product.
- The customer buys a larger amount and uses it over several days or weeks, so the pack needs to reseal.
- The pack sits on a shelf next to other products and needs to be seen from the front.
- The product is loose and pourable: beans, granola, nuts, powder, pet treats, dry mixes.
- You want a large printed front panel for your logo, flavor name and a clear window.
- You plan to sell online as well, where a pouch that stands up photographs better than one lying flat.
The trade-off is that a stand-up pouch uses more film and a little more effort to fill, because the opening has to be wide enough for the contents to drop in while the pouch stands. If you fill by hand, this is a small point. If you use a machine or a co-packer, ask them which pouch style their equipment handles before you order. See our stand-up pouches page for what to check and what to send us.
When a Flat Pouch Is the Better Choice
Pick a flat pouch when most of these points are true.
- The product is thin, light or soft: sachets, sample packs, tea, spices, masks, small parts.
- Each pack is a single portion, so resealing does not matter.
- The pack will hang on a peg, sit in a box or ship inside another pack.
- You want to keep the pack small, light and simple to store.
- Cost per pack matters more than shelf presence.
The trade-off is that a flat pouch does not stand. In a shop it hangs or leans, and online it is usually shown lying down. It also bulges when filled, so a thick or heavy product can stress the seals. If your product is more than a thin layer, check a filled sample before you commit. See our flat pouches page for the points to check.
A Note on Spout Pouches
If your product is a liquid, a sauce, a puree or a soft paste, a spout pouch is usually a better fit than either type above. It is a stand-up pouch with a spout and cap for pouring or squeezing. Tell us the product, its thickness and how it is filled, and we confirm what is possible.
How to Choose in Five Questions
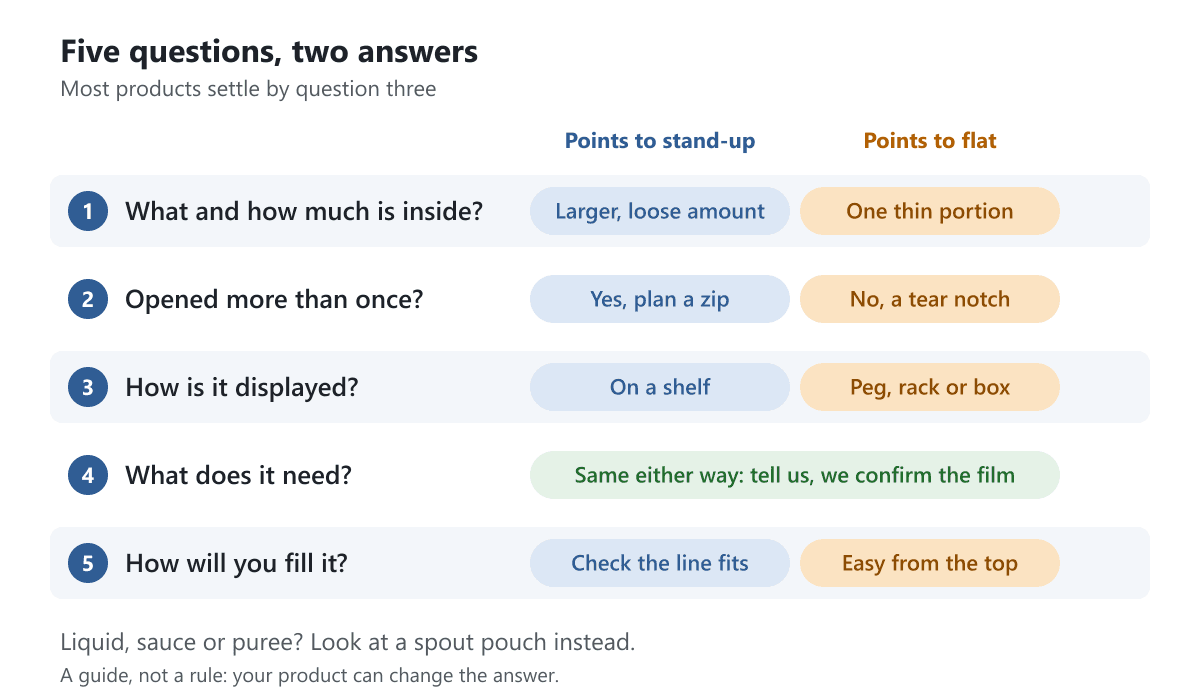
Answer these in order. Most products settle by the third question.
- What and how much is inside? A larger amount points to a stand-up pouch. A single thin portion points to a flat pouch.
- Does the customer open it more than once? If yes, plan a zip and lean toward a stand-up pouch. If it is used once, a tear notch is enough.
- How is it displayed? A shelf favors stand-up. A peg, rack or box favors flat.
- What does the product need? Coffee, snacks and powders need protection from air, light or moisture. Tell us what the product needs and we confirm what is possible.
- How will you fill it? By hand, by machine or by a co-packer. Check which pouch style the filling line can handle.
Sizing a Pouch
Pouches are sized by what they hold, not by the outside of the pack. The only reliable way to find the right size is to fill a real pouch with your product and measure it.
Steps
- Weigh or count the amount you plan to sell in one pack.
- Pour it into a test bag or a similar pouch and see how high it fills.
- Measure the width of the filled pouch and the height from the base to just under the zip or top seal.
- For a stand-up pouch, note the base depth: the amount the base opens when filled.
- Add room for the seals on each side and for the zip or tear notch. These areas cannot hold product.
- Tell us the numbers and the product. We confirm the size that fits.
Volume and weight differ between products. A cup of granola and a cup of tea fill the same space and weigh differently, so a weight alone is not enough. For a flat pouch, measure the product at its thickest point, because that is where the pouch bulges and where a seal is most stressed.
Our guide to measuring a box correctly explains inside and outside sizes for rigid packaging. The same habit of measuring the real product first applies to pouches.
Print Area and Layout
Where you put the logo and text matters more on a pouch than on a flat card, because seals, zips and holes take up space. The picture below shows the zones to keep clear.
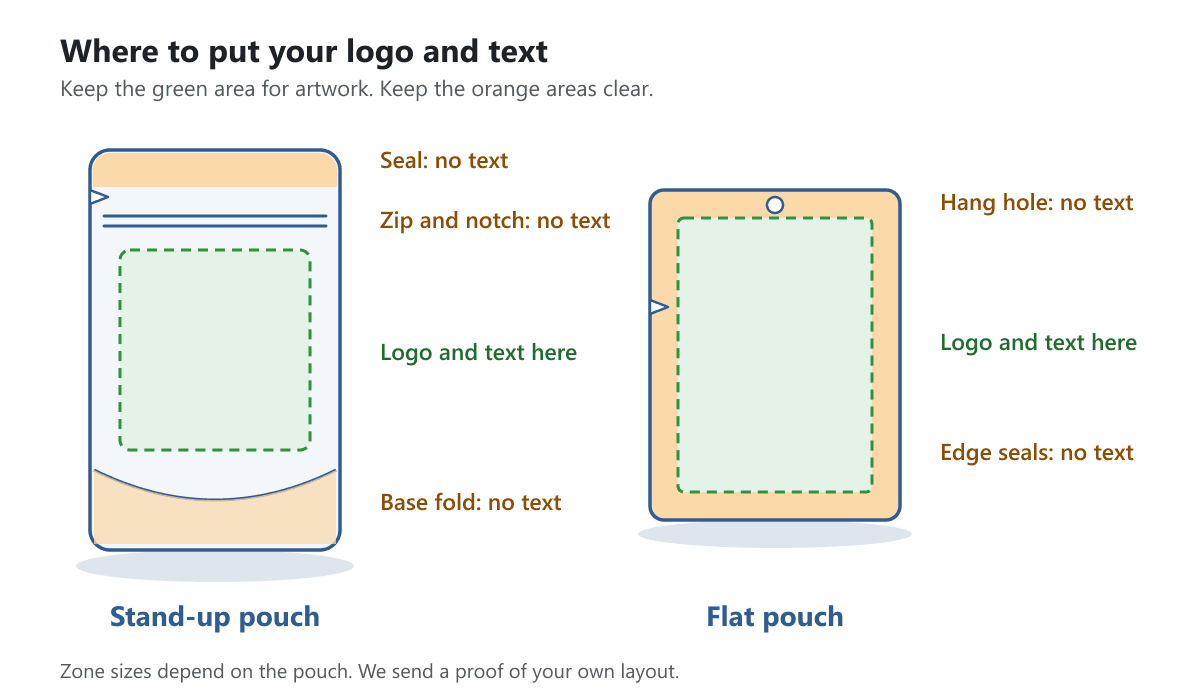
- Keep text and logos clear of the side and top seals.
- Put the logo on the front panel in the middle or just above the middle, where it stays visible when the pouch bulges.
- On a stand-up pouch, leave the lower part of the front for product information, so a folded base does not distort it.
- Keep a clear window away from the seals and the zip.
- On a flat pouch with a hang hole, keep the top edge free of important text.
For artwork files, bleed and safe areas, see our guide on what bleed means in packaging. We send a proof before printing, so you can check the layout on the real pouch shape.
Examples
These are invented examples to show how the reasoning works. They are not real customers.
A Tea Brand With Sample Packs
A small tea brand wants a trial pack with one or two servings, to include in orders and hand out at events. The pack is thin, single use and will sit inside a larger box. A flat pouch fits: it is small, light and simple. The brand adds a tear notch and a hang hole so the pack can also hang from a peg at a market stall.
A Coffee Roaster Selling by the Pound
A roaster sells whole beans in larger bags that customers use for weeks. The pack must stand on a shelf, reseal and protect the beans from air. A stand-up pouch with a zip fits. The roaster asks about barrier film and a one-way valve, and we confirm what is possible for the product.
A Granola Brand With Two Sizes
A granola brand sells a household pack and a single-serve snack. The household pack uses a stand-up pouch with a zip and a clear window. The snack pack uses a flat pouch with a tear notch. The two share the same artwork family, so they look like one product line.
Common Mistakes
- Choosing by looks alone. A pouch that stands is attractive, but a flat pouch may be the better fit for a thin single-serve product.
- Skipping the fill test. A drawing cannot show how the product settles and bulges.
- Forgetting the seals. Seals, zips and notches take space, so the printable area is smaller than the outside of the pouch.
- Ignoring the filling line. Check what your machine or co-packer can handle before you pick a style.
- Ordering a big first run. Order a sample or a small test first, then scale up.
- Leaving out the closure decision. Decide how the customer opens and reseals the pack, and tell us.
A Checklist Before You Ask for a Quote
- The product, its amount per pack and whether it is loose, thick, thin, hot-filled or cold.
- A filled test pouch, with width, height and base depth if you can measure them.
- The closure you want: zip, tear notch, hang hole, or a plain seal.
- What the product needs: protection from air, light or moisture.
- Whether you want a clear window or a fully printed pouch.
- How the pack is sold: shelf, peg, box or online only.
- Your artwork, or tell us you need design help.
Our Pouch Options
We make three pouch types. Each product page lists what to check before you order, the starting price and a quote form.
- Stand-up pouches: for snacks, coffee, granola, pet treats and other dry goods that need to stand and reseal.
- Flat pouches: for sachets, samples, tea, spices and other single-serve or thin products.
- Spout pouches: stand-up pouches with a spout for liquids, sauces and baby food.
You can compare all three on our packaging pouches category page. For bags that close with a zip but are not printed pouches, see our zip lock bags.
What to Do Next
Start with a real fill test and a clear picture of how the pack is shown. Then send us the details. We reply within 1 business day, and our design support is included with your quote. Production takes 5 to 7 working days after your artwork is approved and payment is received, and delivery time is added on top. Larger or more complex orders can take longer, and we confirm the date in your quote.
If you want to hold a sample before you decide, see our samples page or the Standard Sample Kit. When you are ready, request a free quote and tell us which pouch you have in mind.
Frequently Asked Questions
Which is cheaper, a stand-up pouch or a flat pouch?
A flat pouch typically uses less film and is simpler, so it is often the lower-cost option. The final price depends on size, quantity, print and closure, and we give you a quote for your own specification. See the starting price on the product page.
Can a flat pouch stand up?
No. A flat pouch has no base, so it lies down, leans or hangs. If you need a pouch that stands on a shelf, choose a stand-up pouch.
What is the difference between a stand-up pouch and a spout pouch?
A spout pouch is a stand-up pouch with a spout and cap for pouring or squeezing, so it suits liquids, sauces and purees. A standard stand-up pouch has a zip or an open top and suits dry and loose products.
How do I know what size pouch I need?
Fill a real pouch with your product and measure the width and the height of the filled part. Add room for the seals and the closure. Volume matters more than weight, because products with the same weight can fill different amounts of space.
Can I add a zip or a window to either type?
Zips, tear notches, hang holes and windows are common options, and which ones fit depends on the size and the product. Tell us what you need and we confirm what is possible for your pouch.
Can I order a sample before a full run?
Yes. The Samples page lists each sample type, and the Standard Sample Kit costs $50 with shipping included. Test a filled pouch with your own product when you can.
Can you print my pouches with my own design?
Yes. Send your artwork or tell us you need help, and we prepare a proof for your approval. Keep text and logos clear of the seals, the zip and the hang hole.
Written by the PacksDo Team
We make custom printed packaging, from boxes and mailers to bags, labels and inserts. Questions about this guide? Ask us.