In this article
- 1First, Find Out What Kind of Box You Have
- 2What You Need
- 3How to Fold a Slotted Shipping Box
- 4How to Fold a Mailer Box
- 5How to Fold a Tuck End Box
- 6How to Fold a Gift Box With a Lid
- 7How One Flat Sheet Becomes a Box
- 8Folding Stiff or Thick Board
- 9Common Problems and How to Fix Them
- 10How to Flatten and Store Boxes
- 11Folding Many Boxes at Once
- 12Next Step
To fold a cardboard box, lay it flat, fold along every crease so the board bends where it was scored, build the bottom first, and then close it with tape, glue or tabs. For a standard shipping box, fold the two small bottom flaps in, fold the two large flaps over them, and tape the seam in the middle and along both edges.
That is the short answer for the most common box. Different boxes close in different ways, so this guide covers four: the slotted shipping box, the mailer box, the tuck end carton and the gift box with a lid. It also explains how to fold stiff board, how to fix a crooked or loose box, and how to flatten and store boxes afterward.
This guide is about assembling a box that is already cut and scored. If you want to make the pattern yourself, see how to make a paper box template or how to make a box.
Key takeaways
- Work out your box type first. Shipping boxes close with tape, mailers lock with tabs, tuck cartons close with a tucked lid and gift boxes use a separate lid.
- Fold toward the score. The groove should sit on the inside of the fold, or the board cracks.
- Build the bottom first. Small flaps first, large flaps over them, then seal.
- Break stiff folds in. Fold each crease both ways once before you assemble thick board.
- Tape properly. Use wide packing tape on the center seam and both edges.
First, Find Out What Kind of Box You Have
Most flat boxes fall into one of four types. A quick look at the flaps tells you which one.
| Box type | How to recognize it | How it closes | Tools |
|---|---|---|---|
| Slotted shipping box | Four flaps on top and four on the bottom, usually a glued seam on one side | Flaps fold in and are taped | Packing tape |
| Mailer box | One piece with a hinged lid and tabs on the walls | Tabs lock into slots, and the lid tucks in | None |
| Tuck end box | A paperboard carton with a lid at each end | Lids close and tuck inside the front | Glue for the side seam |
| Lid and base box | Two separate pieces | The lid slides over the base | Glue for the corner tabs |
Some boxes arrive pre-glued, which means the side seam is already stuck and the box is a flat tube. Others arrive as an unglued flat sheet. The steps differ slightly, and each section below says how.
Our shipping boxes, mailer boxes and tuck boxes pages show these box types.
What You Need
- A clean, flat surface such as a table, big enough to lay the box open.
- Packing tape, at least 2 inches wide, for shipping boxes. Weak or narrow tape lets the flaps pop open.
- A bone folder or a ruler to press creases on stiff board.
- Glue or double-sided tape for boxes that use glue tabs.
- A box cutter, only for taking boxes apart again.
Give yourself room. A cramped table is a common reason for bent flaps and crooked folds.
How to Fold a Slotted Shipping Box
A slotted box is the plain shipping carton. All four sides have flaps, and the two pairs of flaps differ in length.
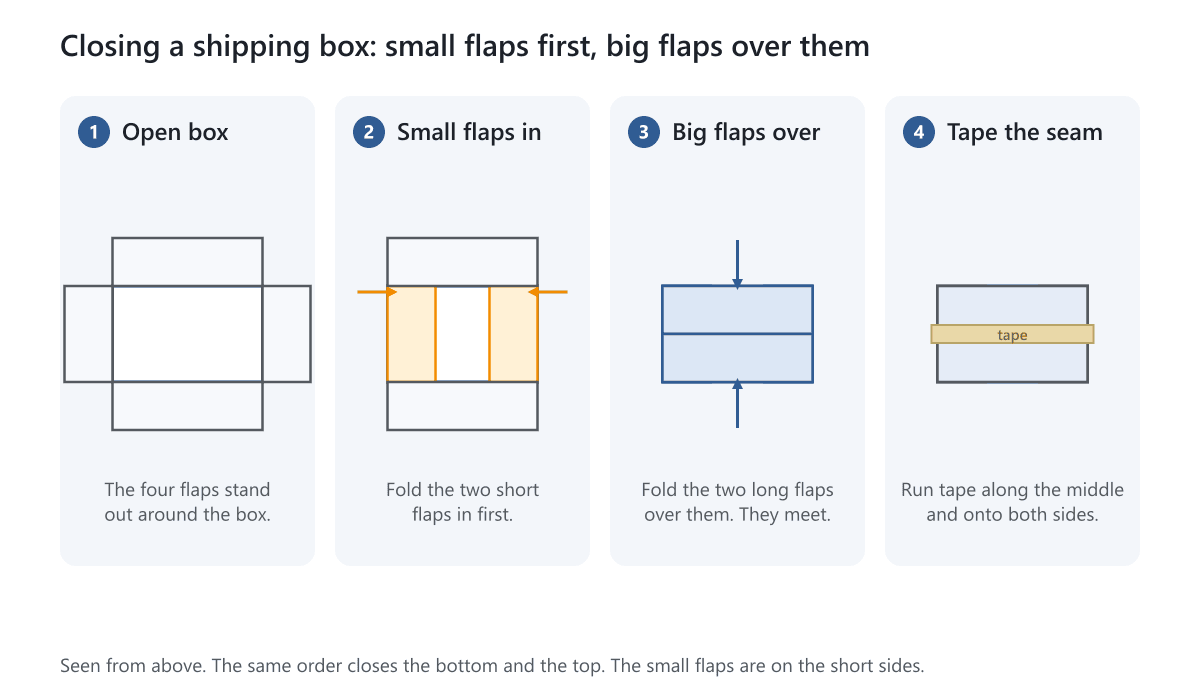
- Step 1: Open the box. If it arrived flat and pre-glued, hold it upright and push the two opposite vertical edges toward each other until it pops into a square tube. Run your hand along each corner to square it.
- Step 2: Fold the bottom flaps. Fold the two short flaps in first. Then fold the two long flaps over them so the edges meet in the middle.
- Step 3: Tape the seam. Run a strip of tape along the center seam and about 2 to 3 inches down each side. Many people also tape the two outer edges. This is often called H-taping.
- Step 4: Stand it up and fill it. Put your product inside, with cushioning if it needs it.
- Step 5: Close the top the same way. Short flaps first, long flaps over, then tape.
If the box arrived as an unglued flat sheet, join the side seam first, using tape or glue on the narrow glue flap, then follow the steps above. Our free shipping box template shows the flat pattern and where the flaps are.
How to Fold a Mailer Box
A mailer box is a one-piece corrugated box with a hinged lid. Most mailers need no tape, because the walls lock themselves.
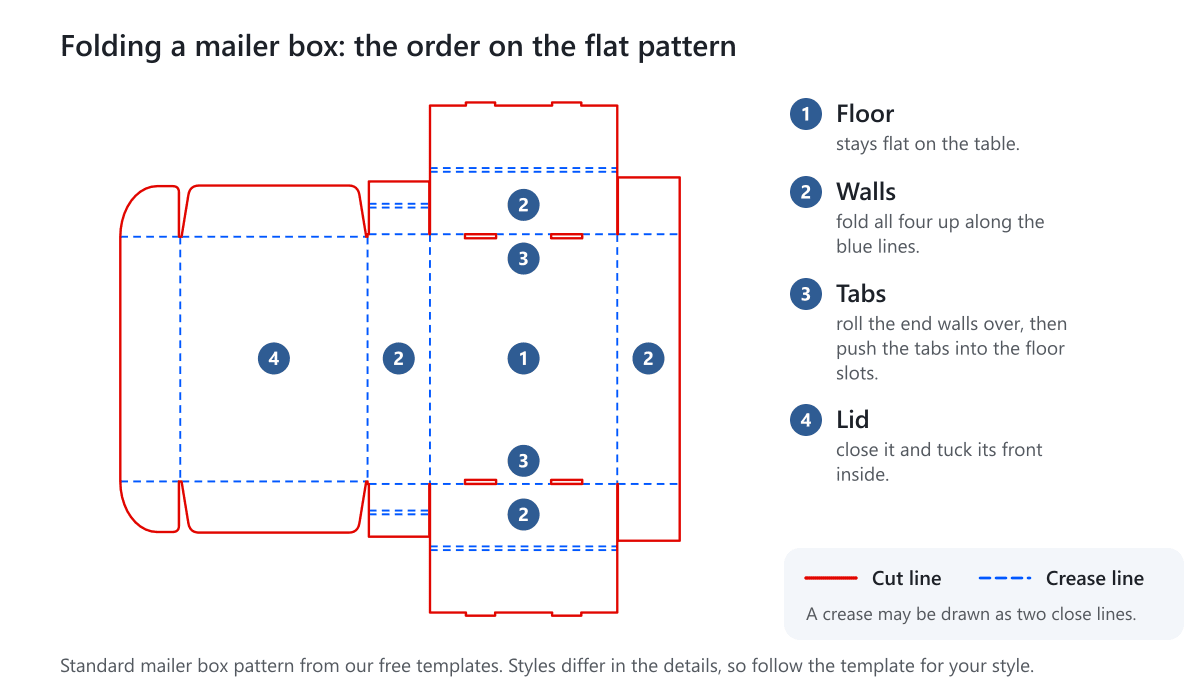
- Step 1: Lay it flat with the inside facing up and find the floor, the large center panel.
- Step 2: Fold the four walls up. Fold each along its crease and press the corners square.
- Step 3: Roll the end walls over. The end walls have a double crease. Roll each wall over its flap, then push the two tabs into the slots in the floor.
- Step 4: Fold the side flaps inside so they lie against the end walls.
- Step 5: Close the lid. Fold its dust flaps down inside, then tuck the front panel behind the front wall.
The details vary by style. A mailer box with adhesive seals with a built-in strip: peel the liner and press it to close. It opens along a tear strip. A mailer without dust flaps skips the dust flap step. Follow the template for your style, such as our standard mailer box template.
How to Fold a Tuck End Box
A tuck end box is a paperboard carton, the kind used for cosmetics and retail products. Both ends have a lid with a tab that tucks inside the box.
- Step 1: Pre-crease every fold. Fold each crease forward and back once. This breaks the board in and makes later folds cleaner.
- Step 2: Make the tube. If the box is not pre-glued, glue the narrow glue flap to the inside of the last panel, hold it until it grips, and check that it is square.
- Step 3: Close the bottom. Fold the dust flaps in first, then close the lid and tuck its tab inside the front panel.
- Step 4: Fill it. Slide the product in from the top.
- Step 5: Close the top the same way: dust flaps, lid, tuck.
On a reverse tuck end box the two lids are on opposite panels, so close the bottom lid first. On an auto lock bottom box the side seam is glued at the factory and the box ships flat. When you open the flat tube, the bottom locks itself, so you only need to fill and close the top. Our straight tuck end template shows all the parts.
How to Fold a Gift Box With a Lid
A lid and base box is two trays. The lid is slightly larger so it slides over the base. The pattern for each tray is the same.
- Step 1: Fold the four walls up along their creases.
- Step 2: Fold the corner tabs inward. Each corner has a small tab.
- Step 3: Glue each tab to the inside of the neighboring wall and hold it until it grips.
- Step 4: Do the same for the other piece.
- Step 5: Slide the lid over the base. It should close easily and lift off without a fight.
See our free lid and base template for the pattern. If you want a drawer-style box, see our tray and sleeve boxes.
How One Flat Sheet Becomes a Box
Every flat box follows the same basic path, whatever the style:
- Crease. The sheet is scored along the fold lines, so it bends in the right place.
- Fold up. The walls rise from a floor or a strip of panels.
- Join. Corners and seams are joined with glue, tape or locking tabs.
- Close. Flaps, lids and tabs close the opening.
A free dieline template shows this plan for each style. You can print one and fold it from plain paper to learn the order before you handle real board. Paper-folding boxes, which use no glue, exist too, but they use thin paper and are not strong enough for products that need protection.
Folding Stiff or Thick Board
Thick board and corrugated board resist folding, and a rushed fold can crack the surface or crush the flutes.
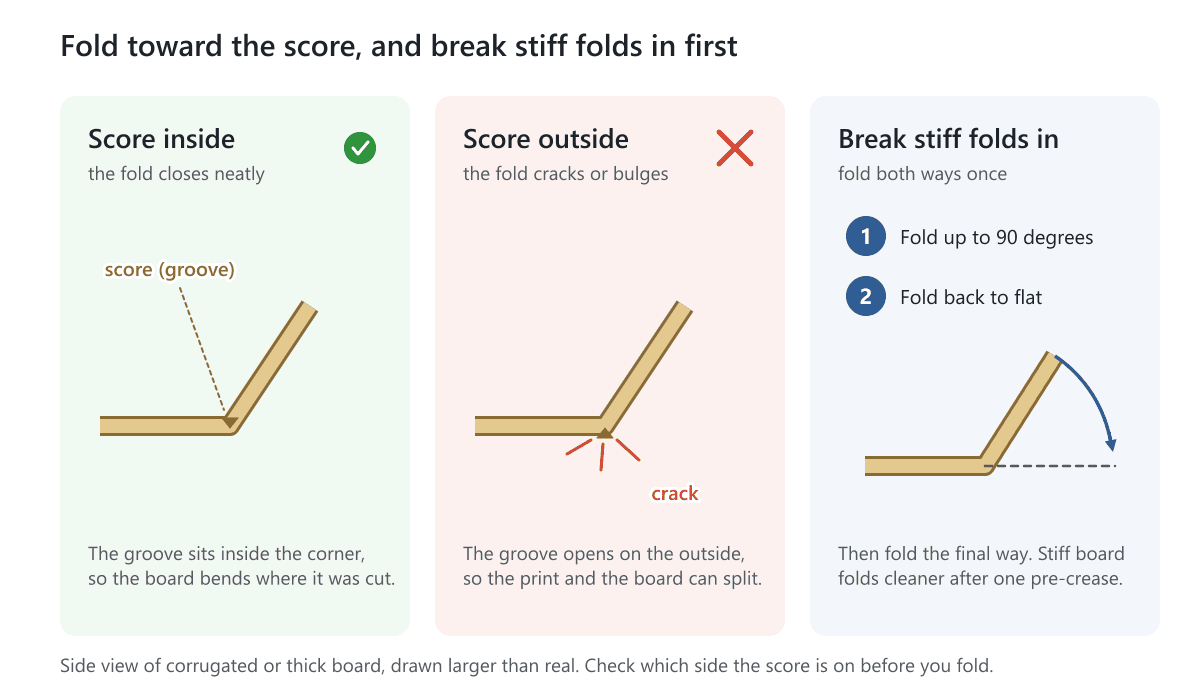
- Fold toward the score. Boxes are normally creased so they fold toward the groove. Look at the crease and fold the way it wants to go.
- Pre-crease. Fold each line up to about 90 degrees, then back to flat, once before assembling.
- Press along the full length. A ruler or a bone folder gives an even fold, where pinching leaves a bulge.
- Fold slowly. Hold the panel at both ends and fold in one smooth motion.
- Do not fold cold or damp board if you can help it. Let it sit at room temperature first, because cold, dry board cracks more easily and damp board goes soft.
- Fold a spare first. One practice fold on a sample shows how the board behaves.
Common Problems and How to Fix Them
| Problem | Likely cause | Fix |
|---|---|---|
| The box comes out crooked | A fold was off the crease, or the corners were not squared | Unfold, re-crease and square each corner before taping |
| The corners are not square | The walls were folded unevenly | Press each corner against a flat table edge while the tape or glue sets |
| The crease cracks or the print splits | Folded away from the score, or board too dry or cold | Fold toward the groove, and pre-crease |
| The flaps pop open | Tape too narrow or weak, or flaps not meeting | Use 2 inch wide tape and tape the center seam and both edges |
| The lid is loose or tight | A small size error, or thick board taking up room | Adjust with a sample, or tell us for the next order |
| The tuck tab will not stay in | The tab was not creased, or the lid was folded the wrong way | Re-crease the lid and tuck the tab all the way in |
| The box bulges | Too much product, or weak board | Use a larger box or an insert |
How to Flatten and Store Boxes
Boxes you plan to reuse or store should be flattened with care.
- Remove the tape. Cut it with a box cutter, set to a shallow depth so the blade does not score the board. Peel the tape off.
- Do not tear the glued seam. On a box with a glued side seam, fold it flat along the original creases.
- Fold along the creases only. New folds weaken the board.
- Stack flat in a dry place, off the floor and away from sunlight.
- Keep them clean and dry. Damp board softens, and light can fade printing.
Our tuck boxes and mailer boxes ship flat, which saves storage space until you need them. For ideas on what to do with old boxes, see ways to reuse packaging boxes.
Folding Many Boxes at Once
If you assemble boxes in volume, a little setup saves a lot of time. Fold five boxes and time them. Here is an invented example: if each one takes 1 minute, 200 boxes take about 3 hours and 20 minutes, which is a morning, so plan the time.
- Set up a station: flat boxes on one side, finished boxes on the other, tape and tools in reach.
- Use the same order every time. The second box is faster than the first.
- Pick styles that go together quickly. A glued flat tube with a self-locking bottom folds faster than an unglued flat sheet.
- Check a sample first. Fold one box from the sample before you commit to hundreds.
Our guide to choosing the right box for your product covers how a box type affects assembly, storage and shipping.
Next Step
Open one box and fold it once, slowly, in the order above. If it does not close well, check which side the score is on and which flaps go first. If you need boxes that fold quickly and close securely, tell us what you are packing and we will recommend a style: get a free quote. To feel real construction first, the Standard Sample Kit costs $50, shipping included.
Frequently Asked Questions
How do you fold a cardboard box without tape?
Choose a box that locks itself. Mailer boxes lock with tabs and slots, and some tuck end boxes close with a tucked lid and an automatic bottom. If you must seal a shipping box without tape, use glue on the flaps, though tape is stronger and faster.
How do you open a flat box that is glued on one side?
Hold it upright with the glued seam at one corner. Push the two opposite vertical edges toward each other so it pops open into a square tube, then square the corners with your hand. Fold the bottom flaps and tape them.
Why won't my cardboard box fold straight?
The fold is usually off the crease line, or the box has been folded away from the score. Unfold it, re-crease along the groove and fold toward it. Thick board also needs a pre-crease, folded forward and back once.
Which flaps should I fold first on a shipping box?
Fold the two short flaps first, then fold the two long flaps over them so the edges meet in the middle, then tape the center seam and both edges. Use the same order on the top.
How do I fold a box from a single sheet of cardboard?
Cut the pattern, score every fold line, fold the walls up and join the corners with glue or tabs, and close the top with flaps or a lid. Our free dieline templates show the pattern for each style. Test with paper first.
How do I make a folded box stronger?
Use wide packing tape on the seams, square the corners and use board that matches the load. Corrugated board suits shipping. An insert or divider holds heavy items so they do not push the walls.
How do I flatten a box without damaging it?
Cut the tape with a shallow cut and peel it off, then fold the box flat along its original creases. Do not tear a glued seam. Stack flat boxes in a dry place, off the floor.
Written by the PacksDo Team
We make custom printed packaging, from boxes and mailers to bags, labels and inserts. Questions about this guide? Ask us.