In this article
- 1What You Need Before You Start
- 2How to Size a Packaging Sleeve
- 3Step-by-Step Guide to Making Packaging Sleeves
- 4How to Check the Fit
- 5Choosing Paper for a Handmade Sleeve
- 6Designing the Sleeve
- 7Common Mistakes When Making Sleeves
- 8When to Order Printed Sleeves Instead
- 9Special Cases
- 10A Quick Checklist
- 11Next Steps
To make a packaging sleeve, measure the width and depth of your box, add a small gap, cut a strip of cardstock as long as two widths plus two depths plus a glue tab, and as tall as you want the sleeve to be. Then score and fold it at each corner, glue the tab, and slide it on. A first sleeve takes about 30 to 45 minutes, and later ones take much less.
This guide gives you the exact sizing sum with a worked example, the tools and paper to use, the steps, how to check the fit, and the mistakes that waste the most paper. It also explains when it is better to order custom printed sleeves instead of making them yourself. If you want the basics first, read our guide to what a sleeve in packaging is.
Key takeaways
- The sum is simple: flat length = 2 x (width + depth) + a small gap + a glue tab. The height is up to you.
- Add about 1/16 inch of room to the width and to the depth so the sleeve slides on. Test with a paper mock-up first.
- Use cardstock, not plain paper. Something around 80 to 110 lb cover (about 216 to 300 gsm) holds its shape.
- Score before you fold, and place the glue seam on the back so it does not spoil the design.
- Make by hand for a handful of units. For 100 or more, printed sleeves are more even, faster and can have finishes you cannot do at home.
What You Need Before You Start
You need very little. The one item worth buying properly is the cutting tool, because a clean edge is what makes a handmade sleeve look professional.
| Item | What it is for | Notes |
|---|---|---|
| Cardstock | The sleeve itself | About 80 to 110 lb cover (roughly 216 to 300 gsm). Matte is easier to glue than glossy |
| Steel ruler | Straight cuts and creases | A plastic ruler gets nicked by the knife |
| Craft knife and cutting mat | Clean cuts | Scissors work but are less accurate on long strips |
| Bone folder or blunt tool | Scoring the fold lines | The back of a butter knife also works |
| Double-sided tape or craft glue | Closing the glue tab | Tape is cleaner on coated paper |
| Pencil and tape measure | Marking and measuring | Use one unit for everything |
| Scrap paper | A test sleeve | Cheap paper is fine for the mock-up |
Our free packaging sleeve dieline can replace the marking step. Type the front width, side width and sleeve length, download the flat pattern as a PDF, and print it at 100 percent to use as a cutting guide. It shows the panels, the fold lines and a glue flap at real size.
How to Size a Packaging Sleeve
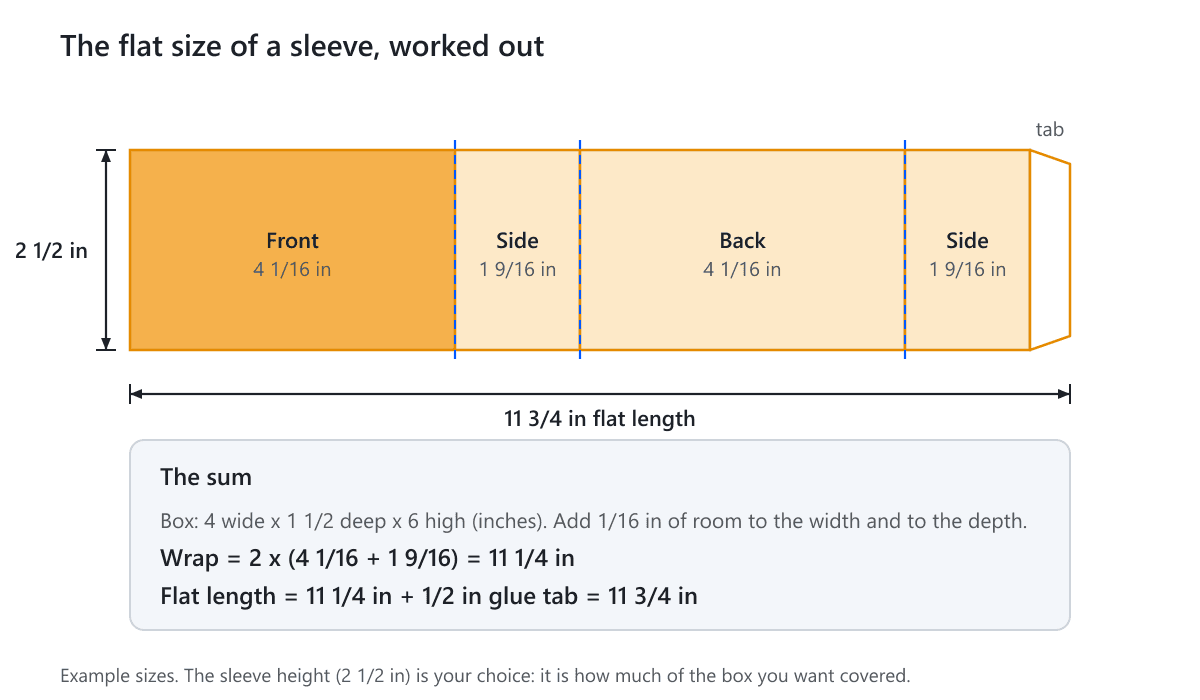
A sleeve wraps around the box like a belt, so its flat length is the distance all the way around the box, plus a gap, plus a tab to glue it shut. Its height is a design choice: a narrow band covers a little of the box, and a tall sleeve covers most of it.
The Sum
- Width (W): the length of the wide front face of the box, measured left to right.
- Depth (D): the length of the narrow side face, measured front to back.
- Gap: about 1/16 inch added to W and to D, so the sleeve slides on.
- Glue tab: usually 1/2 inch, wide enough to hold firmly and narrow enough to stay neat.
The flat length is 2 x (W + D), with the gap added, plus the tab. Measure the box at its widest points, because boxes bulge a little at the corners and sides.
A Worked Example
Take a box that is 4 inches wide, 1 1/2 inches deep and 6 inches tall. Add 1/16 inch to the width and the depth, which gives an opening of 4 1/16 by 1 9/16 inches.
The wrap is 2 x (4 1/16 + 1 9/16), which is 11 1/4 inches. Add the 1/2 inch tab and the flat strip is 11 3/4 inches long. If you want the sleeve to cover 2 1/2 inches of the 6-inch height, cut it 2 1/2 inches high. This fits on one 11 x 17 inch sheet, so you can cut several from one sheet.
These numbers are an example. The right gap depends on the board: thicker board adds a little at each fold, so give it slightly more room. The reliable way to check is a paper test, which we cover below.
How Tall Should the Sleeve Be?
Height decides what the sleeve does. A band of 1 to 2 inches around the middle is a classic belly band: it shows the box and adds a message. A sleeve that covers most of the box acts as the main print surface. A sleeve that is taller than the box is unstable and slides off, so keep the sleeve shorter than the item. If you need the box measured properly first, see our guide to measuring the dimensions of a box.
Step-by-Step Guide to Making Packaging Sleeves
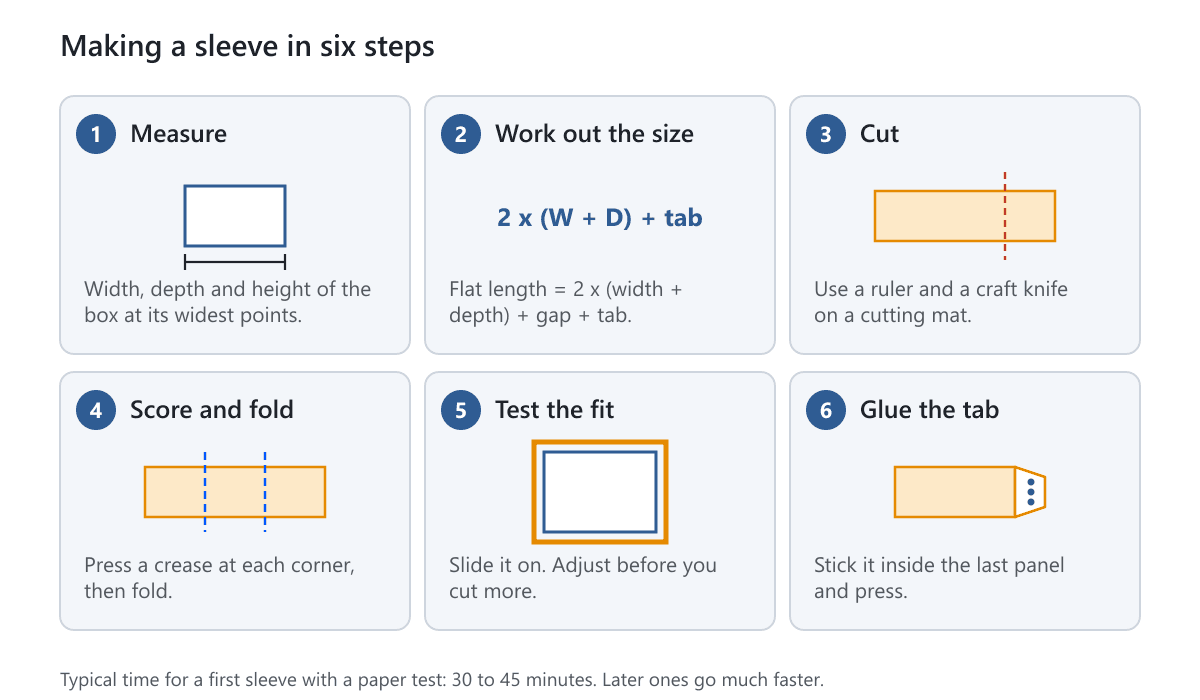
1. Measure Your Product
Put the box on a flat surface and measure its width, depth and height with a ruler. Measure at the widest point of each side and write the three numbers down in one unit. If the box is a shipping box or a mailer, measure the box you actually have, not the size on the label, because they can differ.
2. Work Out the Flat Size
Use the sum above. Write down the length of each of the four panels (front, side, back, side) and the tab, so you can mark the fold lines in the next steps. The two sides are the same length, and so are the front and back.
3. Cut the Strip
Mark the length and height on the cardstock with a pencil. Hold the steel ruler firmly and cut with the knife in one or two light passes, rather than one hard cut. Cut the tab corners at a slight angle, which makes them easier to tuck. Check that the strip is a clean rectangle by measuring both diagonals: if they match, it is square.
4. Design and Print the Sleeve
Add the design before you fold, because it is easier to print on a flat strip. Print on the strip, or print on sticker paper and stick it on. Home printers often cannot take a strip as long as 11 3/4 inches, so use a print shop or the tabloid size, or print the design in two pieces and join them on a fold line. Keep text at least 1/8 inch away from every fold and every edge, so a small cutting or folding shift does not clip it.
5. Score and Fold
Scoring means pressing a line into the paper so it folds exactly there. Lay the ruler on the fold mark and run the bone folder along it with firm pressure. Score the inside face, the one that will not be seen, then fold toward that side. Crease each fold sharply with your finger or the bone folder.
6. Test the Fit
Before you glue, wrap the strip around the box and hold the tab in place. It should slide on and off with light friction. The next section shows what to look for.
7. Glue the Tab
Put double-sided tape or a thin line of glue on the tab, fold the strip into a loop around the box, and press the tab to the inside of the first panel. Hold it for 20 to 30 seconds. Check that the seam is straight and the edges meet cleanly. Then slide the sleeve on.
How to Check the Fit
Always make one sleeve from scrap paper before you cut your good cardstock. The paper mock-up costs almost nothing and shows every sizing mistake.
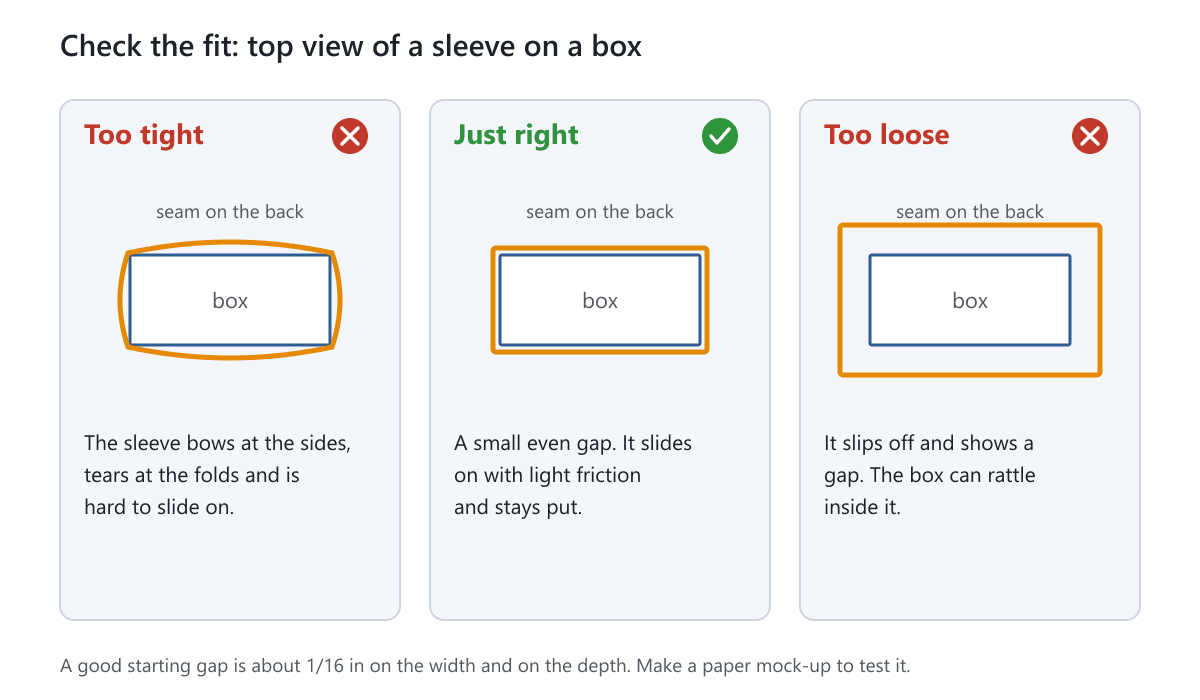
- Too tight: the sleeve bows at the sides, the folds crack and the box scuffs as it goes in. Add 1/32 to 1/16 inch of room and cut again.
- Just right: it slides on with light friction and stays in place when you tilt the box.
- Too loose: it slips off or shows a gap. Take 1/32 to 1/16 inch out of the length, or make the panels slightly narrower.
Check the fit with the box packed and the product in it, because a full box is a little bigger than an empty one. Check it again after a day, because glue and paper can shift slightly.
Choosing Paper for a Handmade Sleeve
The paper decides how the sleeve folds, holds its shape and prints. Plain printer paper is too thin and will sag. Heavy board will crack at the fold unless you score it well.
| Paper | Good for | Watch out for |
|---|---|---|
| Matte cardstock (80-110 lb cover) | Most handmade sleeves, easy to glue and print | Heavier stock needs a deeper score |
| Kraft cardstock | A natural look on soap, candles and gifts | Light colors do not show on brown, so print dark or white ink |
| Glossy cardstock | Bright photos and bold color | Glue slips on it, and fingerprints show |
| Thin paper (20-28 lb) | Nothing for a sleeve alone | Sags and wrinkles; use only with a stiff backing |
| Thick poster board | Large, stiff sleeves | Cracks at folds, hard to cut cleanly |
Paper has a grain, which is the direction its fibers run. Folds that run parallel to the grain are cleaner, and folds across it can crack, especially on thicker or coated stock. If a fold cracks, test a scrap with the fold turned the other way. For more on board weights, see what sleeve paper is used for.
Designing the Sleeve
A sleeve is read from the front, so put the most important mark there and make it simple.
- Put the seam on the back. The overlap is the least tidy part of the sleeve.
- Keep text away from the folds and edges. About 1/8 inch is a safe margin.
- Extend the background past the cut line if the design runs to the edge. This extra is called bleed. Our guide to bleed in packaging explains it.
- Plan the sides too. On a belly band the sides are seen from an angle, so a repeating pattern or a short message works well.
- Leave room for what you must show, such as a barcode, ingredients or a legal line.
Common Mistakes When Making Sleeves
- Cutting the good paper before making a test sleeve.
- Adding no gap, so the sleeve is hard to slide on.
- Measuring a crushed or bulging box and sizing from that.
- Skipping the score and folding by eye, which gives crooked corners.
- Folding against the grain on thick stock, which cracks the fold.
- Using a glossy tab with craft glue, which does not hold.
- Putting the seam on the front.
- Making the tab too narrow, under about 3/8 inch, so it peels.
- Forgetting that the design shifts if you cut slightly off the line.
When to Order Printed Sleeves Instead
Making your own is a good choice for a few units, a prototype or a one-time event. As the numbers grow, hand work becomes slow and the sleeves vary. A printed order gives you identical sleeves, with the print, coating and finish a home printer cannot do.
| Make it yourself | Order printed sleeves | |
|---|---|---|
| Quantity | A handful to a few dozen | From 50 units on our packaging sleeves |
| Consistency | Varies from sleeve to sleeve | Identical, cut and glued by machine |
| Print and finish | Home or office printer | CMYK or Pantone, with matte, glossy, satin or soft touch finishes, plus foil stamping, embossing and spot UV |
| Time | About 30 to 45 minutes for the first one | Production takes 5 to 7 working days after approval and payment |
| Fit | You test it by trial | Sized from your dimensions on a dieline we confirm before printing |
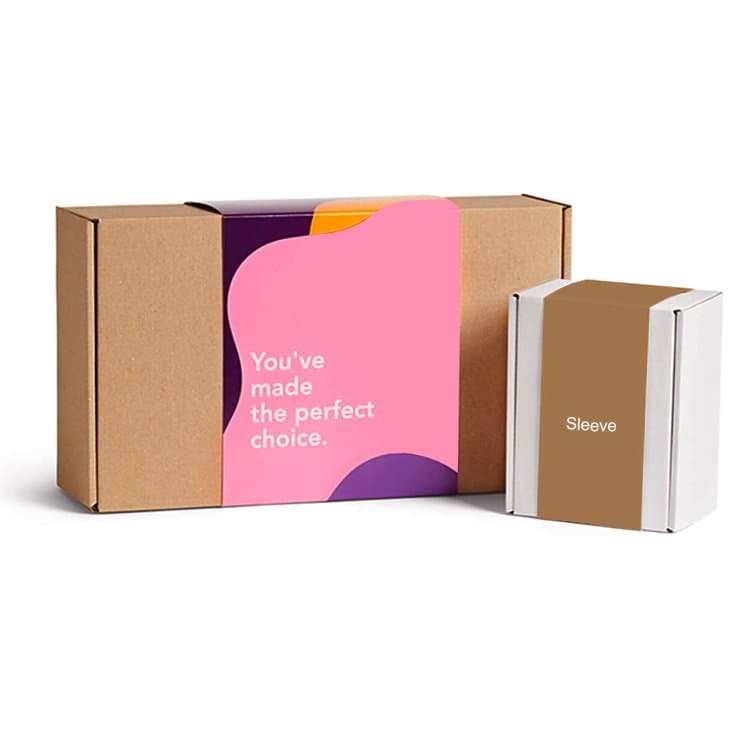
We make three sleeve styles from paperboard and kraft.
- Pre-glued sleeves arrive already glued flat. You open them and slide them on, which suits many identical boxes packed quickly.
- Sleeves with adhesive wrap around the item and close with an adhesive strip, which suits unusual shapes.
- Flat sleeves arrive unglued, with fold lines if you want a guided fold, so you wrap and close them yourself.
See the custom packaging sleeves page for each style, the minimum order and the starting price. Production time is counted from approved artwork and payment, and delivery time is added on top.
What to Send for a Quote
Tell us the size of the box or product, the sleeve style you prefer, the quantity, the board you want (white or kraft), the printing and finish, whether your artwork is ready, and where it ships. If you do not know the right size, send the box measurements and we will size the sleeve. We offer free design support and confirm the dieline before printing.
Special Cases
Round or Odd-Shaped Items
A jar, bottle or tube needs a different sum, because the sleeve wraps around a curve. Measure the circumference with a flexible tape, add an overlap, and use an adhesive strip rather than a glued tab. Our sleeves with adhesive are made for this.
Sleeves for Tray and Sleeve Boxes
A sleeve that is part of a drawer-style box must fit the tray as well as the product. Size the tray first, then the sleeve around it. See our tray and sleeve boxes and the matching dieline.
Sleeves for Shipping Boxes
A corrugated mailer is thicker and less exact than a carton, so test the fit on a real box from your stock. Allow slightly more gap than for a carton.
A Quick Checklist
- Box measured at its widest points, in one unit.
- Flat length worked out: 2 x (W + D) + gap + tab.
- Paper mock-up made and tested for fit.
- Cardstock chosen with the folds parallel to the grain where possible.
- Fold lines scored on the inside face.
- Design kept 1/8 inch away from folds and edges, with the seam on the back.
- Tab glued and the sleeve checked on a packed box.
Next Steps
Make one paper sleeve today. Use the worked example, change the numbers to match your box, and test the fit. If you like the result and want more than a few, check the Standard Sample Kit, which costs $50 with shipping included and lets you hold printed pieces first, then get a free quote.
Frequently Asked Questions
How do you make a packaging sleeve?
Measure the box, work out the flat length as 2 x (width + depth) plus a small gap and a glue tab, cut a strip of cardstock that long and as tall as you want the sleeve, score and fold it at each corner, and glue the tab. Test the fit on a paper mock-up first.
What paper is best for packaging sleeves?
Cardstock of about 80 to 110 lb cover (roughly 216 to 300 gsm) works for most handmade sleeves. It is stiff enough to hold its shape and thin enough to fold cleanly. Matte stock is easier to glue and print than glossy.
How much bigger should the sleeve be than the box?
Add about 1/16 inch to the width and the depth as a starting point so the sleeve slides on. Thicker board needs slightly more room. Make a paper test sleeve to confirm, because boxes and board vary.
How wide should the glue tab be?
Usually about 1/2 inch. Under about 3/8 inch it can peel, and over 3/4 inch looks bulky and wastes board. Place it on the back so the seam is hidden.
Can I make a packaging sleeve without a printer?
Yes. You can draw or stamp the design by hand, use kraft cardstock for a natural look, or stick printed labels on a plain sleeve. Cut and fold the sleeve first, then decorate it.
How many sleeves can I make by hand before ordering printed ones?
A handful to a few dozen is practical. Past that, hand work is slow and the sleeves vary, so a printed order is usually better. Our packaging sleeves start from 100 units.
Can I get a template for a sleeve?
Yes. Our free sleeve dieline template draws the flat pattern from your sizes, with fold lines and a glue flap, in PDF, SVG or DXF at real size. It does not account for board thickness, so test the fit and we confirm the final dieline before printing.
Written by the PacksDo Team
We make custom printed packaging, from boxes and mailers to bags, labels and inserts. Questions about this guide? Ask us.