In this article
- 1How Folding Carton Sizes Are Written
- 2Step 1: Measure the Product As It Will Be Packed
- 3Step 2: Add Clearance
- 4Inside Size, Outside Size and Board Thickness
- 5Example Sizes by Product Type
- 6How the Carton Style Changes What You Measure
- 7Inserts, Windows and Wraps
- 8Where the Sizes Sit on the Flat Pattern
- 9Standard Sizes or a Custom Size?
- 10Tolerance: What to Expect From Finished Cartons
- 11Check the Fit Before You Print
- 12Common Sizing Mistakes
- 13A Short Sizing Checklist
- 14Get Your Size Checked
To size a folding carton, measure your product as it will be packed, add about 1/16 to 1/8 inch (1.5 to 3 mm) of room on each side, and give us that number as the inside size, written length x width x height. Paperboard is thin, so the finished carton ends up only about a millimeter larger on the outside.
This guide is about folding cartons: printed paperboard boxes that ship flat and fold up for retail, such as tuck end cartons and pillow boxes. It covers how sizes are written, how much clearance to leave, what board thickness changes, example sizes for common products, how an insert changes the numbers, and how to check the fit before you print.
For the full method of measuring any box, see our guide to measuring box dimensions. Here we apply it to cartons. If you are still choosing a style, start with our guide to folding cartons, and for board and finish choices read the paperboard guide.
Key takeaways
- Size from the inside. The inside is the space your product has to fit, so it is the number to give us.
- Leave a little room. About 1/16 to 1/8 inch (1.5 to 3 mm) on each side suits a hard product. Soft products, wraps and inserts need more.
- Board is thin, but it adds up. Folding carton board (300 to 400gsm) makes the outside about 1 mm larger than the inside. Across 50 cartons that is about 50 mm.
- Keep the order. Write length x width x height, with length and width describing the opening. Do not reorder the numbers by size.
- Test before you print. Measure with the cap, wrap or insert on, then check the fit with a sample.
How Folding Carton Sizes Are Written
Every carton size is written the same way: length x width x height (L x W x H). Length and width describe the opening at the end where the product goes in. Height is the depth, measured along the side. Of the two opening sides, the longer one is the length.
That rule surprises people, because the biggest number is not always the length. A lip balm carton can be 1 x 1 x 3.3 inches. Its height is the largest number, but it is still the third one, because it is the side that stands up. A bar of soap in a carton that lies flat can be 3.7 x 2.5 x 1.3 inches. Keep the order, and tell us which way the carton stands.
Write both units if you can. Inches suit US suppliers and shelves. Millimeters are easier for small products because you can skip the fractions. Pick one unit for every number in a set, and say whether the size is inside or outside. If you do not say, we will ask, because the answer changes the box.
Some styles name the sides differently. On a pillow box, for example, length means the straight distance between the two curved creases. Each of our free dieline templates labels the sides for its style, so read the labels before you type a number.
Step 1: Measure the Product As It Will Be Packed
Measure the product in the position it will sit in the carton, at its widest points, with everything that goes in the carton with it. The method is the same one we describe in our measuring guide. A few points matter most for cartons.
- Include the cap, pump or dropper. On a bottle, the closure often sets the height.
- Include wraps and labels. A shrink band, a pouch or a layer of tissue adds thickness.
- Measure three units. Poured, handmade and molded products vary a little. Use the largest number for each side.
- Think about the opening. On a tuck end carton the product slides in through one end, so it has to pass through the length and width of the opening, even if it later stands tall.
- Write down the weight. A heavy product changes the board and the bottom style, not only the size.
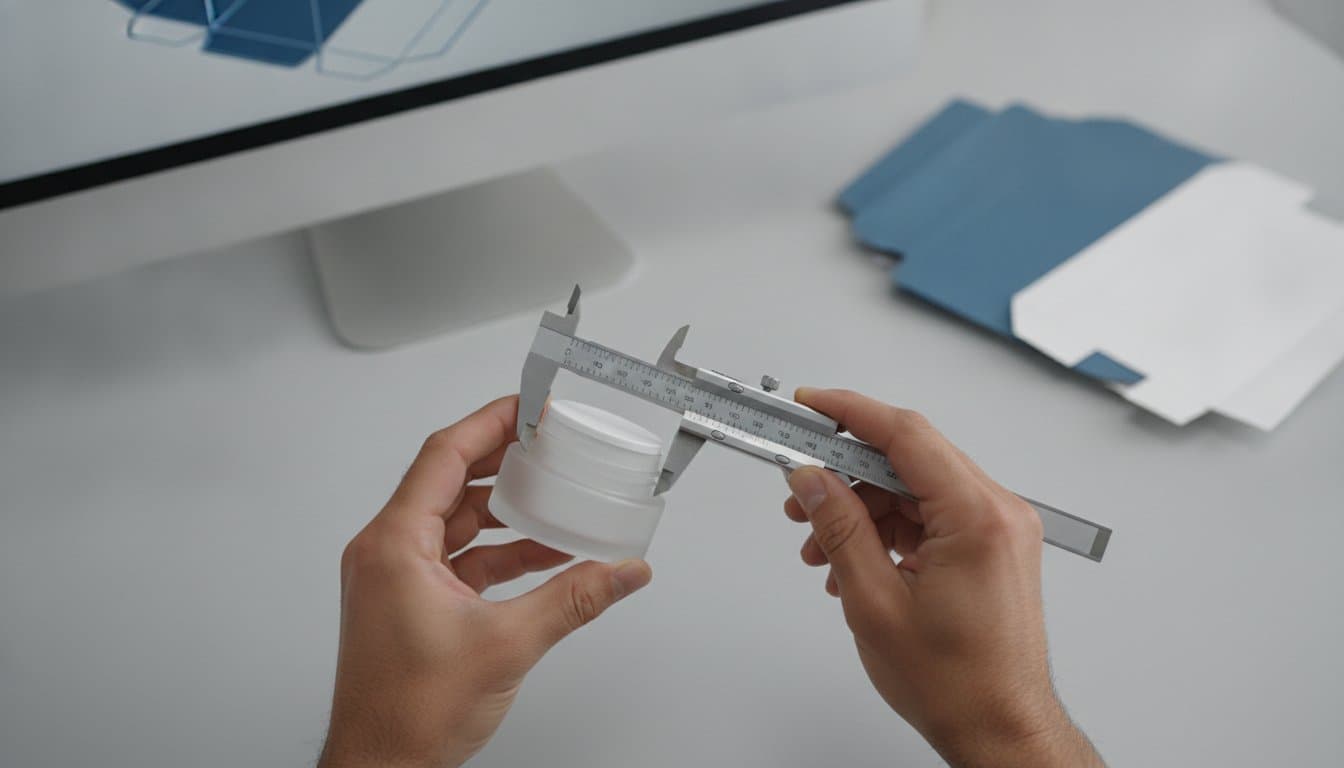
Use calipers, or a ruler with millimeter marks. A cloth tape rounds too much on small products.
Step 2: Add Clearance
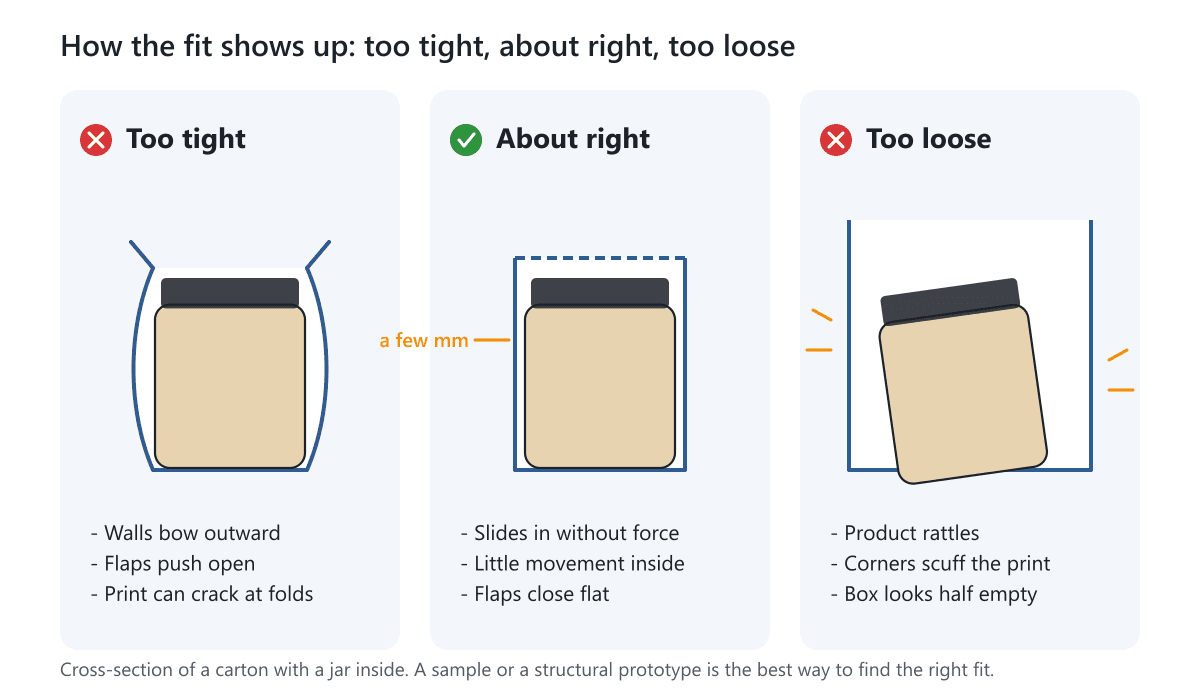
Clearance is the small gap between the product and the inside walls. It lets the product slide in without scraping the print, and it lets the flaps close flat. With none, the carton bulges. With too much, the product rattles.
A good starting point for a hard product such as a bottle, jar or tube is about 1/16 to 1/8 inch (1.5 to 3 mm) on each side. For height, leave a little more, so the tuck flap can close without pressing on the product. In the examples below we use 2 mm on each side for length and width and 4 mm in all for height. These are starting points, not rules.
When to Leave More Room
- Soft or squeezable products. Pouches, cream tubes and wrapped bars compress and bulge. Measure them filled.
- Products in tissue or a pouch. Measure with the wrap on, then add room.
- Cartons filled by hand at speed. A slightly looser fit is faster to pack.
- Anything with an insert. Size around the insert, as shown further down.
When to Leave Less
A tight fit suits a hard product that should not move on a shelf. Be careful, though. Too tight, and the board can bow outward, the tuck flaps can push open, and the print can crack at the folds. If you are unsure, leave a few tenths of a millimeter more and test it.
Inside Size, Outside Size and Board Thickness
The inside size is the space for your product. The outside size is the inside size plus the board on each side. Folding carton board is typically 300 to 400gsm, which is roughly 0.4 to 0.6 mm thick (gsm is weight per square meter, so the exact thickness depends on the board). Two walls add about 1 mm, so the outside of a carton is about 1 mm larger than the inside in each direction.
One millimeter looks harmless, and for a single carton it is. It matters in two places. First, when cartons sit side by side. Fifty cartons in a row make the row about 50 mm (2 inches) longer than the inside sizes add up to. Second, when the carton has to fit something with a fixed size, such as a shipping box, a shelf slot or a display tray. Size those from the outside in: take the space you have, subtract the board, and check that the inside is still big enough.
Folds also use a little space. Where the board bends at a crease, the layers need room, so panels are not exactly the sizes on the page. That is why we confirm the final dieline before printing. Our free dieline templates draw the pattern at the size you type and do not compensate for board thickness. Use them to plan artwork and check proportions, and treat the final dieline as the authority.
| Board | Rough thickness | What it does to the size |
|---|---|---|
| Folding carton board, 300-400gsm | About 0.4 to 0.6 mm | Outside is about 1 mm larger than the inside |
| Corrugated, for mailers and shipping boxes | About 1 to 4 mm, depending on the flute | A few millimeters on each side |
| Rigid board, 800-2000gsm, wrapped in paper | Several millimeters | The outside is clearly larger than the inside |
The table shows why the same product needs different outside sizes in different boxes. Our measuring guide works through that with a rigid box example.
Example Sizes by Product Type
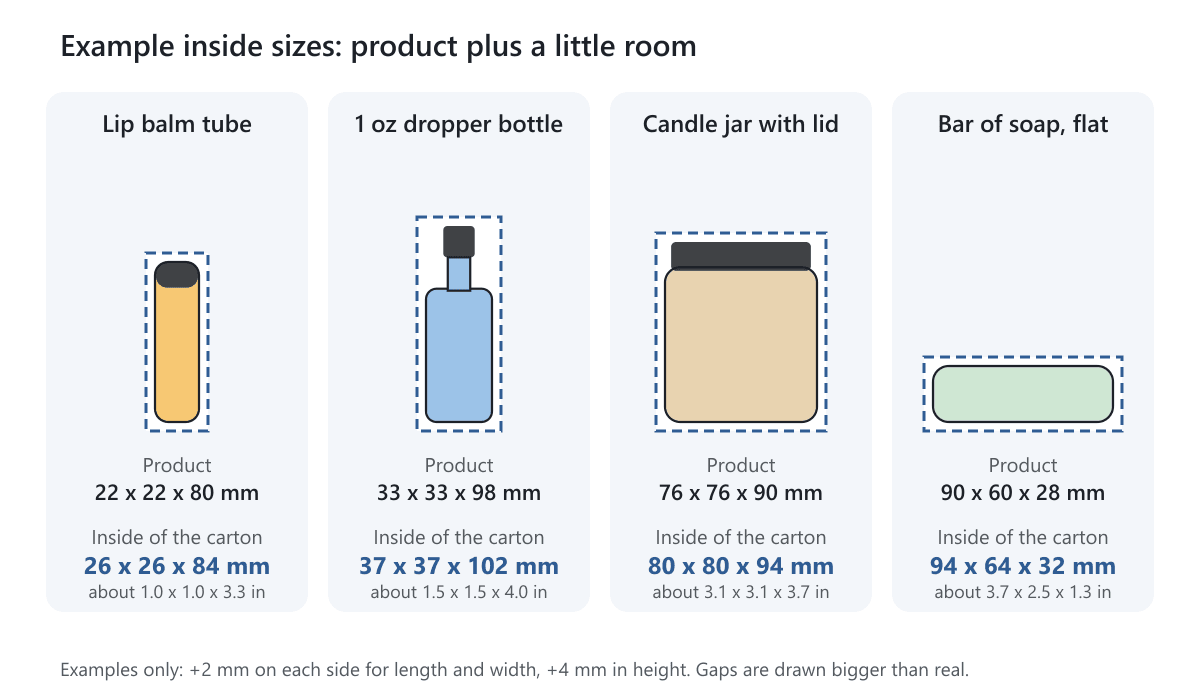
These examples apply the clearance rule above. The products are typical examples, not our specifications, so measure your own.
| Product | Measured | Inside size of the carton | Watch for |
|---|---|---|---|
| Lip balm tube | 22 x 22 x 80 mm | 26 x 26 x 84 mm (about 1.0 x 1.0 x 3.3 in) | A tall, thin carton can bow in the middle, so do not add extra width |
| 1 oz dropper bottle | 33 x 33 x 98 mm | 37 x 37 x 102 mm (about 1.5 x 1.5 x 4.0 in) | Measure with the dropper on: it sets the height |
| Candle jar with lid | 76 x 76 x 90 mm | 80 x 80 x 94 mm (about 3.1 x 3.1 x 3.7 in) | Heavy for its size: think about the bottom style and board |
| Bar of soap, lying flat | 90 x 60 x 28 mm | 94 x 64 x 32 mm (about 3.7 x 2.5 x 1.3 in) | A wrap or label adds thickness |
Round Products
Round products such as bath bombs and jars want to roll, so a square carton can leave them loose in the corners. Size the carton to the widest diameter and keep the clearance small. Then do a rattle test: shake the sample and listen. If the product moves, reduce the width or add an insert. Our bath bomb boxes page shows styles used for this kind of product.
Bottles and Tubes
The closure usually decides the height, and the shoulder of the bottle decides how much room the tuck flap has. Measure the bottle assembled and standing, then add the height clearance. Some tube cartons use a holder that keeps the tube upright, and our dieline generator has a tuck end box with tube holder for that case.
Heavy Products
A glass candle jar puts its weight on the bottom panel, so size is only part of the answer. Lock bottom styles such as the auto lock bottom and snap lock are made for heavier items. For anything that will also be shipped, plan an outer shipping carton, because a folding carton is not built to travel on its own.
How the Carton Style Changes What You Measure
The three numbers mean the same thing across most styles, but each style adds parts that use board.
- Tuck boxes. A straight tuck end and a reverse tuck end have the same length, width and height. Only the placement of the flaps differs. The tuck flap folds into the carton, so leave a little room above the product.
- Lock bottoms. The bottom of an auto lock or snap lock carton is made of folded panels. You still measure the inside the same way.
- Pillow boxes. The curved ends pinch in, so the usable space near each end is shorter than the stated length. Allow extra length for products with square ends.
- Tray and sleeve boxes. The sleeve has to slide over the tray, so it needs a small clearance of its own. Our template uses 1.5 mm, and a sample will confirm the feel.
- Gable boxes. The peaked roof adds to the overall height, so check the shelf or the shipper against the total, not only the wall height.
Inserts, Windows and Wraps
An insert is a cradle that holds the product in place. It takes space, so it belongs inside your measurement. Measure the product with the insert around it, add room to slide in, and that is the inside of the carton. In the example below, a 40 mm product with a 3 mm insert on each side and 2 mm of room needs a 50 mm inside, and the finished carton is about 51 mm on the outside.
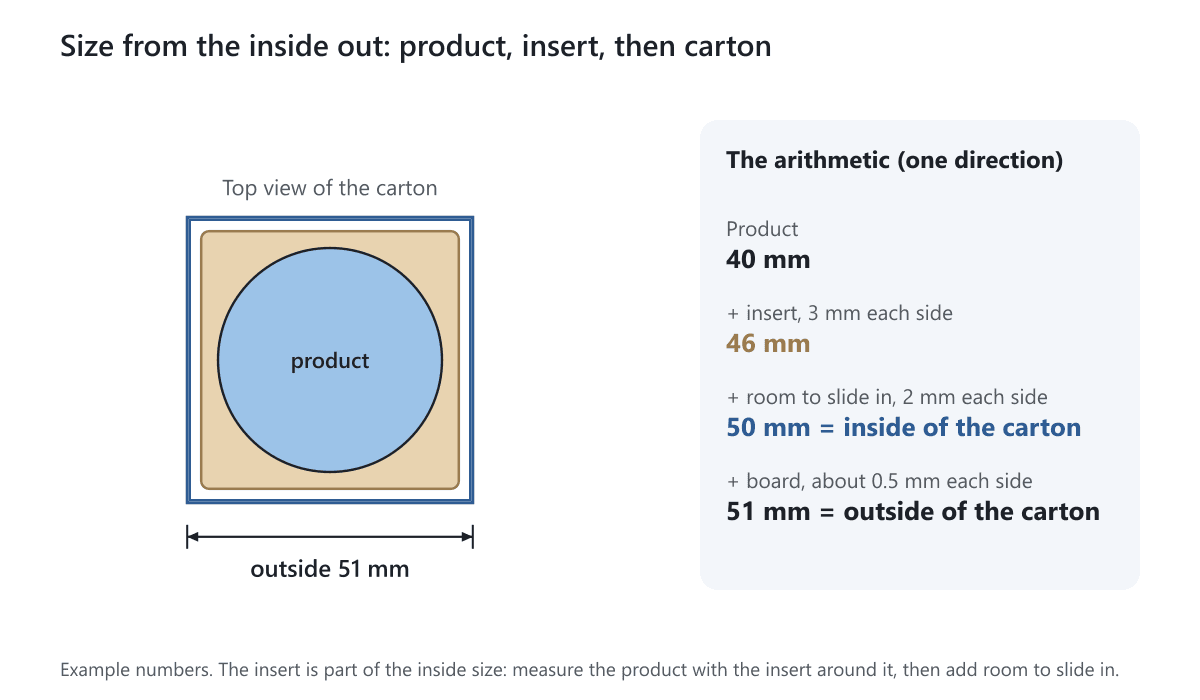
Our box inserts page lists the options. If a carton has a window, the product has to sit still behind it, so a snug fit or an insert matters more, or the product slides off center. Tissue and wraps also add thickness, so include them when you measure.
Where the Sizes Sit on the Flat Pattern
Cartons ship flat, so the sheet that is printed and cut is much bigger than the finished carton. In our example, a straight tuck end carton of 100 x 50 x 150 mm needs a flat pattern of about 315 x 294 mm, because it includes the tuck flaps, dust flaps and a glue flap.
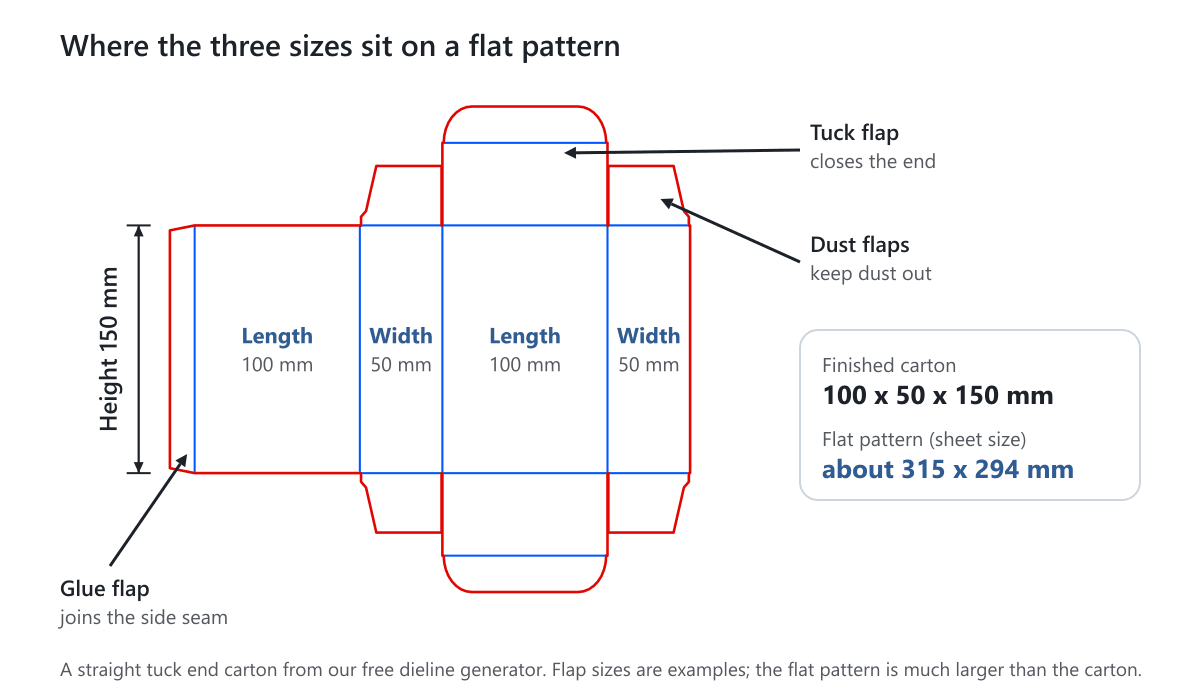
This is why the flat size matters for cost: more board per carton means a higher price, so a carton that is 20 mm taller than it needs to be costs more than one that is a few millimeters taller. Our packaging cost guide explains how the open size of a box drives price.
Standard Sizes or a Custom Size?
Folding cartons are normally made to the size of the product rather than picked from a fixed range. We make them around the dimensions you give us, so you do not need to bend your product to a catalog size. A size made for the product avoids empty space, and empty space costs you in board, in shipping volume and in damage when the product moves.
There are still reasons to keep a size simple. If you sell several products in one line, using one width and changing only the height can keep the shelf neat and make assembly easier. If you plan to pack cartons into a shipping box, choose a size that stacks without waste. When you cannot decide, tell us what you sell and how it is sold, and we will suggest a size and style.
Tolerance: What to Expect From Finished Cartons
Cartons are cut, creased, folded and glued, and every step leaves a small variation. Finished sizes commonly land within a millimeter or two of the drawing, and some styles vary more. Ask what to expect for your style, and do not design a fit so tight that a 1 mm difference breaks it.
Paperboard also reacts to moisture. A stack stored in a damp room can swell slightly and curl. Keep cartons flat in a dry place until you use them.
Check the Fit Before You Print
Changing a number on a drawing costs nothing. Changing it after thousands of cartons are printed costs the whole run. Work through these steps before you approve a size.
- Step 1: Draw it. Open the free dieline template for your style, type the inside size and check the proportions of the flat pattern.
- Step 2: Order a structural sample. It is an unprinted prototype that shows the size and form of your carton. See the samples page for every sample type.
- Step 3: Test the real product. Fill it, close it, shake it, then stand it on each end.
- Step 4: Test the real packing. Put the carton in its shipper, or on the shelf where it will sit.
- Step 5: Adjust and confirm. Send us the corrected inside size. We confirm the final dieline with you before printing.
The Standard Sample Kit costs $50, shipping included, and lets you hold the boards and styles before you decide. It may not include rigid boxes or boxes that ship assembled.
Common Sizing Mistakes
- Sending an outside size when the carton was designed from the inside, or the other way around.
- Reordering the numbers so the largest one comes first.
- Measuring the bottle without its cap or the jar without its lid.
- Forgetting the insert, wrap or tissue that goes in the carton.
- Leaving no room, so the product has to be forced in.
- Leaving too much room, so it rattles and the carton looks half empty.
- Measuring only one unit of a product that varies.
- Ignoring the weight of a heavy product when choosing the board and bottom.
- Skipping the sample because the numbers looked right on paper.
A Short Sizing Checklist
- Product measured with cap, wrap and any insert, in one unit.
- Three units measured, largest number used.
- Clearance added: about 2 mm per side as a starting point.
- Size written as inside length x width x height, with the order checked.
- Outside limits checked, if the carton must fit a shipper or a shelf.
- Weight noted, and the bottom style and board chosen for it.
- Dieline checked and a sample ordered.
Get Your Size Checked
If you have the numbers, send them with the style you have in mind and the quantity, and we will tell you what we see. If you only have the product, tell us what it is and how it will be sold, and we will recommend a size and a style. We offer free design support and reply within 1 business day. Get a free quote, or look at the folding carton page for the styles we make.
Frequently Asked Questions
How much clearance should a folding carton have?
About 1/16 to 1/8 inch (1.5 to 3 mm) on each side is a common starting point for a hard product such as a bottle, jar or tube. Leave more for soft products, wraps and inserts, and test the fit with a sample.
Should I give inside or outside dimensions for a folding carton?
Give the inside dimensions, and say so. They describe the space your product has to fit. The outside size is the inside size plus the board on each side, about 1 mm more on folding carton board.
Is a straight tuck end box the same size as a reverse tuck end box?
Yes. Both use the same length, width and height. Only the placement of the tuck flaps differs. Read our tuck box guide to choose between them.
Do I need to make the carton bigger if I add an insert?
Yes. An insert takes space, so measure the product with the insert around it and add room to slide in. The insert is part of the inside size, not an extra.
How do I size a carton for a round product?
Use the widest diameter for length and width, keep the clearance small, and measure the height with the cap or lid. Shake a sample to see if it moves. If it does, narrow the carton or add an insert.
What is caliper, and how does it relate to gsm?
Caliper is board thickness, often given in points (1 point is 0.001 inch). Gsm is weight per square meter. They are different measures, and a bulkier board is thicker at the same gsm. Our folding carton board is typically 300 to 400gsm.
How do I work out the volume of a carton?
Multiply the inside length by the inside width by the inside height. Volume helps you compare sizes or check that several items fit. For shipping, carriers use the outside size of the packed box instead.
Written by the PacksDo Team
We make custom printed packaging, from boxes and mailers to bags, labels and inserts. Questions about this guide? Ask us.