In this article
- 1Start With What Goes in the Box
- 2Box Structures for Cosmetics
- 3Inserts and Trays That Hold Bottles and Jars
- 4Size the Box Around the Bottle or Jar
- 5Finishes and Print Details
- 6Labels and Required Text: The Brand Is Responsible
- 7Test a Sample Before You Order
- 8Shelf Boxes vs Shipping Boxes
- 9Sustainability Choices, Stated Carefully
- 10How to Choose: A Decision Table
- 11What Changes the Price and the Minimum
- 12Common Mistakes
- 13Checklist Before You Request a Quote
- 14Related Guides
- 15Your Next Step
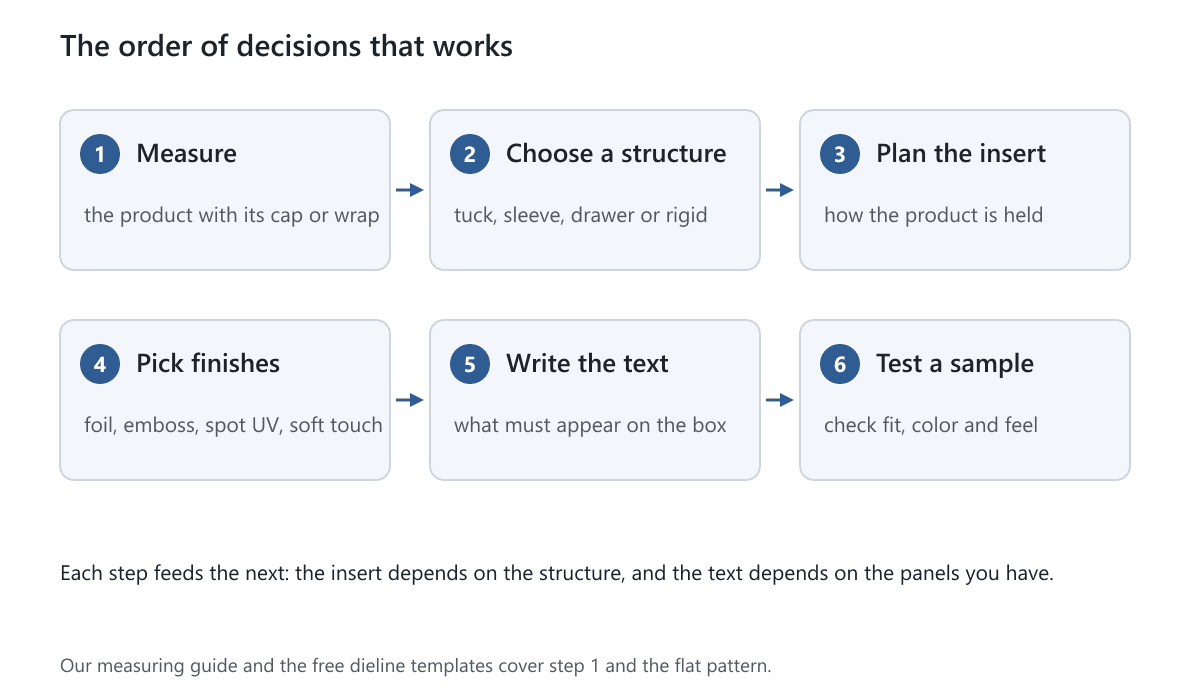
The right box for a cosmetic product depends on three things: what the product is, how it is sold, and how it travels. For most skincare and makeup, a printed tuck box with a fitted insert is the practical starting point. Gift sets and premium lines often move up to a drawer box or a rigid box.
This is the overview guide to cosmetic packaging boxes. It covers the main box structures, inserts, sizing, finishes, labeling, samples, shipping and sustainability, and ends with a decision table. If you already know your product, three narrower guides go further: lipstick boxes, eyeshadow palette packaging and soap boxes.
Key takeaways
- Start with the product, not the box. Measure the bottle, jar or tube with its cap on, then add clearance. Our measuring guide shows how.
- Match the structure to the job. Tuck boxes suit most single products, drawer and rigid boxes suit gifts and sets, and sleeves add a layered look at low cost.
- An insert decides whether glass arrives whole. A bottle or jar that can slide around will scuff or break, so plan the insert early.
- Finishes should have a job. Foil, embossing, spot UV and soft touch each change how the box looks and feels. Use one or two, not all four.
- The brand owns the label text. We print what you give us. Tell us what must appear so we leave room for it.
- Test a sample before a full run. Fit, color and closing are much easier to judge in your hand than on a screen.
Start With What Goes in the Box
Cosmetics cover very different shapes, so the product sets the structure. Think of four groups. Skincare is mostly bottles, droppers, pump bottles, jars and tubes. Makeup includes lipstick tubes, compacts, palettes, mascara and brushes. Fragrance is a glass bottle that needs strong protection and often a gift look. Haircare can be anything from a small oil bottle to a large shampoo bottle.
The table shows common matches. These are starting points, not rules. A small brand with a luxury serum might choose a rigid box, and a large brand with a budget serum might choose a plain tuck box.
| Product | Common structure | Insert? | Things to check |
|---|---|---|---|
| Dropper bottle or serum | Tuck box, sometimes a rigid box | Usually a collar or tray | Height with the dropper cap, glass weight |
| Jar or cream | Tuck box, sleeve or rigid box | A tray with a round cutout | Lid width, jar weight |
| Lipstick or lip balm | Small tuck box, sleeve or drawer | A platform that holds the tube upright | Tube length and diameter |
| Eyeshadow palette | Magnetic rigid box or tray and sleeve | A recess shaped to the palette | Thickness, mirror, hinge |
| Perfume bottle | Rigid box or tray and sleeve | A fitted tray, sometimes foam | Bottle shape, cap, weight |
| Tubes (cream, sunscreen) | Tuck box | Often none | Tube crimp and cap size |
| Hair oil or shampoo | Tuck box or mailer | Often none | Weight, leaks, shipping route |
Our industry pages show how we group these needs: see cosmetic packaging, with its own pages for lipstick boxes, perfume boxes and cream boxes.
Box Structures for Cosmetics
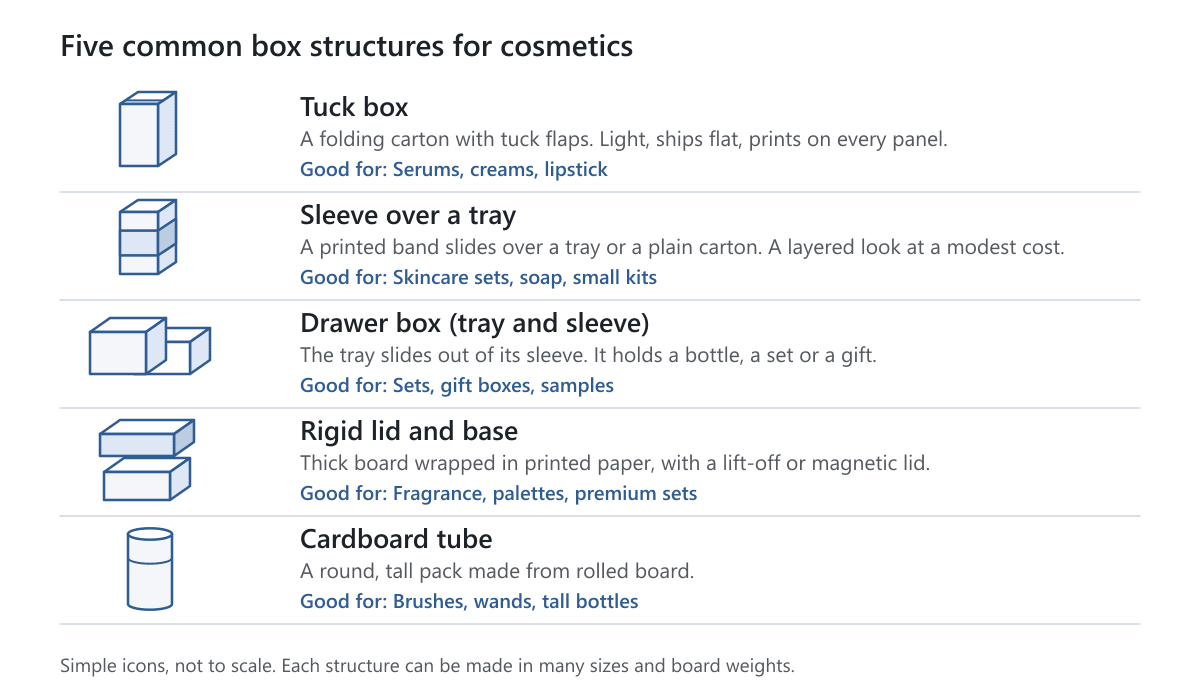
A box structure is the way the box is built and opened. Each one changes cost, protection and the feel in the hand. Here are the five most common ones.
Tuck Boxes
A tuck box is a folding carton made from one flat sheet of paperboard. The lid closes by tucking a flap into the front. It ships flat, prints on every panel and is the most economical structure for most cosmetics. Our tuck boxes come in several end styles, and the straight tuck end and reverse tuck end are the two you will see most. The difference is which way the lid opens.
Sleeves
A packaging sleeve is a printed band that wraps around a tray, a plain box or a product. It lets you add a full-color brand layer to a simple, cheaper base. Sleeves also let you change the look for a limited edition without redesigning the whole box.
Drawer Boxes (Tray and Sleeve)
A tray and sleeve box has a tray that slides out of an outer sleeve, like a matchbox. It is a good fit for sets, because the whole display is revealed at once, and it feels more special than a tuck box without the cost of a rigid box.
Rigid Boxes
Rigid boxes use thick board, 800 to 2000gsm, wrapped in printed paper. They do not fold flat once made, they feel heavy and solid, and they hold their shape. The usual choice for fragrance, palettes and gift sets. If you want a premium look at a lower cost, a two piece foldable box uses a lid and a base that ship flat.
Tubes and Other Shapes
A cardboard tube suits tall, round products. For small items a pillow box works as a light gift pack, and a gable box with a carry handle works for gift sets and sample packs. Both are less common for skincare, so check the fit with a sample.
Inserts and Trays That Hold Bottles and Jars
An insert is a shaped piece inside the box that holds the product in place. Without one, a bottle in a tuck box can rattle, and glass can chip against the carton or against other glass. With one, the product sits where you want it, and the box looks neat when it opens.
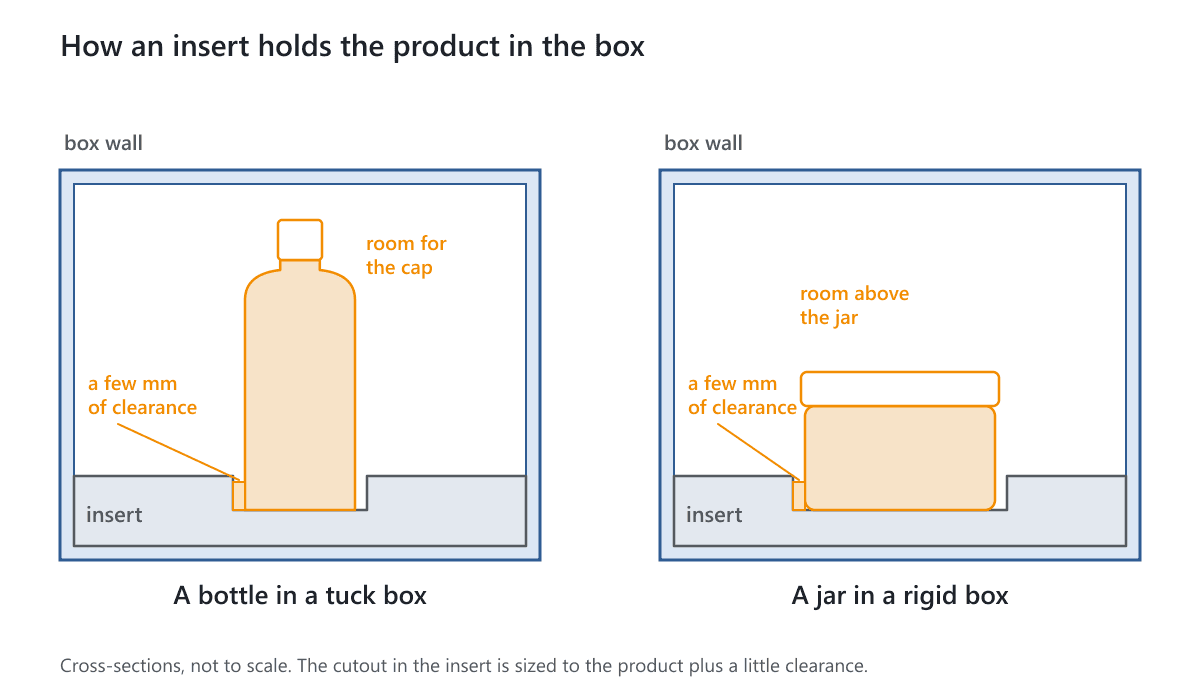
Box inserts can be made from cardboard, molded pulp, foam or plastic. Cardboard and pulp are paper-based and easy to recycle where facilities accept them. Foam grips the most closely and is often chosen for heavy or delicate glass. Plastic gives a clean display. Match the material to the weight of the product and the story you want to tell.
Common Insert Layouts
- A collar. A ring of board that grips the neck of a bottle and keeps it centered. Light and cheap.
- A tray with cutouts. A flat piece with holes shaped for each product. Works for jars, sets and tubes.
- A platform. A raised ledge that holds a tube or compact upright, with space below for a leaflet.
- A fitted recess. A deeper cavity that wraps the product. Common in rigid boxes for palettes and fragrance.
Plan the insert with the box, not after it. The insert uses space, so it changes the inside height of the box. Our inserts checklist goes through the choices in more detail.
Size the Box Around the Bottle or Jar
Measure the product the way it will sit in the box: cap on, pump on, tag or wrap on. Write the length, width and height, then add a few millimeters of clearance on each side, about 1/8 inch, so the product slides in without scuffing the print. Our measuring guide explains inside and outside dimensions and board thickness.
A Worked Example
This is an invented example, to show the arithmetic. A serum bottle is 1.5 inches across and 4.5 inches tall with the dropper cap on. With 1/8 inch of clearance on each side, the inside width and length are 1.5 + 0.25 = 1.75 inches. For the height we add 0.2 inch of headroom and a 0.4 inch tray under the bottle: 4.5 + 0.2 + 0.4 = 5.1 inches. The inside size to give us is 1.75 x 1.75 x 5.1 inches.
A paperboard carton adds only a fraction of a millimeter per wall, so the outside is about the same. A rigid box adds several millimeters per wall, and that matters if the box has to fit a shelf or a shipper. Test any size on a flat pattern with our free dieline templates.
Watch for Awkward Shapes
Pumps, droppers and tall caps change the height. A jar with a wide lid changes the width at the top. A round bottle in a square box leaves empty corners, and the insert has to fill them. If your product has an unusual shape, send us the drawing or a sample, and we will tell you what we need to see.
Finishes and Print Details
A finish is a treatment added to the board after printing. Printing itself is done in CMYK or Pantone: CMYK builds colors from four inks and suits photos and gradients, while Pantone matches one exact brand color. Our color systems guide explains the difference.
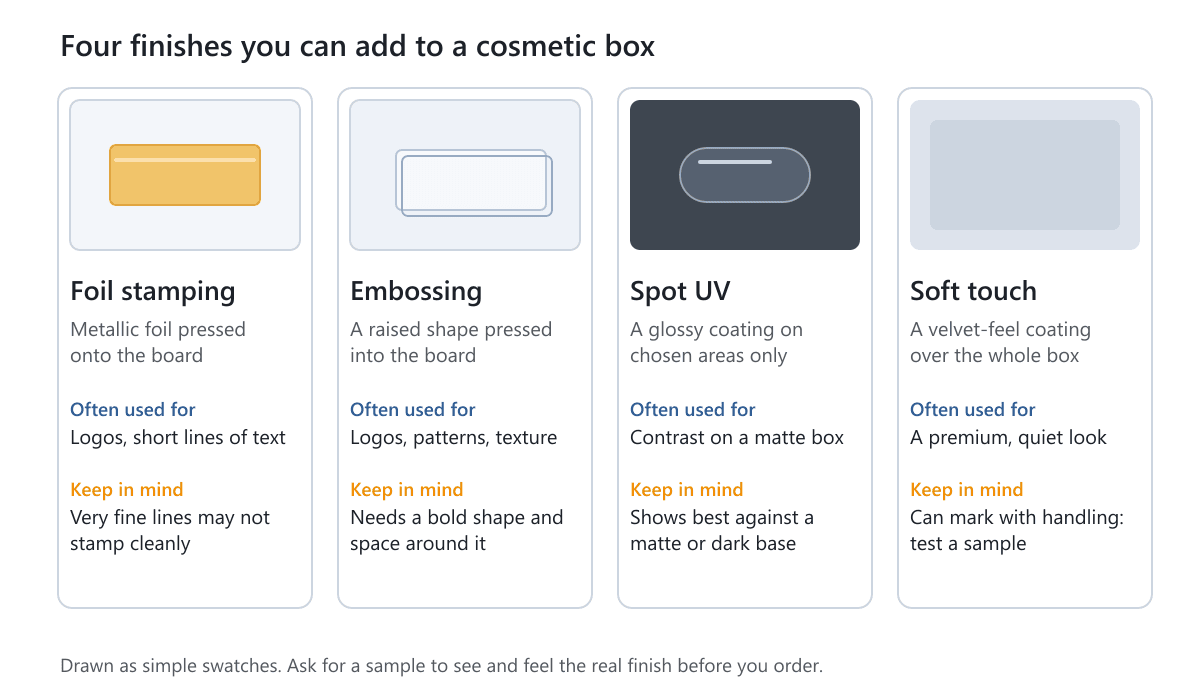
Coatings come first: a varnish or lamination in matte, glossy, satin or soft touch finish. Matte looks quiet and flat, gloss looks bright and strong in color, and soft touch feels velvety. See varnish vs lamination for the difference.
On top of the coating you can add foil stamping, embossing or debossing, and spot UV. Window patching is available too, which is a clear film over a cut-out window. A few habits make these finishes work better.
- Use fewer, bolder details. Fine lines and tiny text may not stamp or emboss cleanly. Ask us for the smallest size that works on your board.
- Give effects room. Leave space around an embossed or foiled logo so it does not crowd the edge or a fold.
- Pair finishes on purpose. Spot UV shows best against a matte base. Foil looks richest on a dark or solid color.
- Send artwork with bleed. Color that runs to the edge needs extra artwork past the cut line. Read our guide to bleed in packaging.
Labels and Required Text: The Brand Is Responsible
Cosmetic boxes carry more than a logo. Many countries require specific text, and the brand, not the printer, is responsible for it being correct. We print the artwork you approve. We do not check it against regulations.
In the US, cosmetic labels generally carry the product name and what it is, the net contents, the name and address of the company, an ingredient list, and any directions or warnings that apply. Recent US rules also ask for contact details for reporting adverse events. Other countries have their own rules, for example for ingredient names, language and symbols. Always check the current rules for each market you sell in, with the regulator's guidance or a regulatory adviser.
Plan the Panels Early
- List the text first. Ingredients, net weight in more than one unit, barcode, batch or lot code, warnings, website, recycling marks.
- Decide where each item goes. Front for brand and product name, back or side for ingredients and directions, an end panel for the barcode.
- Keep small text readable. Very small type is hard to print on coated board and hard to read.
- Use stickers for what changes. Batch codes, shade names or market-specific text can go on a sticker or label so you do not reprint the box.
Tell us at the start which text must appear, and whether any of it changes between batches. We will leave space for it on the dieline.
Test a Sample Before You Order
A flat proof on a screen cannot show how a box closes, how the insert grips, or how a finish feels. A sample can. A structural sample is an unprinted prototype that shows the size and form of your box. The Standard Sample Kit costs $50, shipping included, and lets you hold box types and finishes. It may not include rigid boxes or boxes that ship assembled, so ask us about rigid samples. The samples page lists every sample type.
What to Test
- Fit. Does the product slide in and out without force? Does it move when you tilt the box?
- Closing. Does the lid stay shut? Does the tuck flap hold without bulging?
- Finish. Look at it under shop lighting and daylight. Rub it with a dry finger.
- Print. Check brand colors against a printed reference, not a screen.
- Transit. Drop a packed box from table height and shake it. Open it and look for scuffs.
Shelf Boxes vs Shipping Boxes
A box on a store shelf and a box in a parcel face different problems. A shelf box has to look good from three feet away and survive being picked up. A parcel has to survive a conveyor belt, a delivery van and a doorstep. Many cosmetic brands need both, and treat the retail box and the shipping box as two separate jobs.
| Shelf (retail) | E-commerce (shipped) | |
|---|---|---|
| Main job | Attract and inform | Arrive undamaged |
| Typical outer box | The printed carton itself | A printed carton inside a mailer or shipping box |
| Strength needed | Handling by shoppers | Shocks, stacking, moisture |
| Print priority | Front panel, brand color, finishes | Unboxing view, inside print, inserts |
| Size priority | Fits the shelf and the display | Fits the carrier's size bands |
For e-commerce, a printed carton usually goes inside a mailer box or a shipping box, with paper or an insert to stop movement. A lighter box that is too big can cost more to ship than a snug one, because carriers price by size as well as weight. Our guide to packaging cost covers the cost drivers.
Sustainability Choices, Stated Carefully
Shoppers ask about packaging waste, and the rules about environmental claims are strict, so be specific and check what you can prove. Paper and cardboard are widely collected for recycling where facilities accept them. Plain paperboard and corrugated without plastic film are generally the easiest to recycle. Foil, lamination, plastic windows, glues and mixed materials can make recycling harder, and the rules differ by town.
Our boxes are paper-based. Recycled stock options are available on request, so ask us what is possible for your project. We do not make general claims about recycled content, certifications or what happens to a pack at the end of its life, because those depend on the exact board, ink and finish and need documents to prove. If you plan to put a recycling or eco claim on your box, check it against the rules in your market first.
Practical Ways to Cut Waste
- Right-size the box. A smaller box uses less board and ships cheaper.
- Keep finishes simple. One matte coating with a bold print is easier to recycle than layers of film and foil.
- Ship flat, assemble later. Folding cartons and two piece foldable boxes arrive flat and use less space.
- Use paper-based inserts where the product allows it.
Read more in our guide to eco-friendly packaging materials and on the eco-friendly packaging page.
How to Choose: A Decision Table
Use the table to narrow the choice, then confirm with a sample. Find the row closest to your situation and read across.
| Your situation | Good starting point | Why |
|---|---|---|
| Single product, sold in stores, tight budget | Tuck box, simple coating | Lowest cost, ships flat, prints on every panel |
| Single glass product, sold online | Tuck box with insert, inside a mailer | Holds the glass still, protects in transit |
| Gift set with 2 to 4 items | Tray and sleeve, or rigid box with tray | Shows everything when opened, feels like a gift |
| Premium launch, small run | Rigid box with foil or embossing | Strong first impression, solid structure |
| Limited edition or seasonal look | Sleeve over a standard box | Change the look without a new box |
| Samples or travel sizes | Small tuck box or pillow box | Light, low cost, easy to include in orders |
| Very tall, round product | Cardboard tube | Fits the shape and stands out |
Our guide to choosing the right box for your product covers the same question across product types.
What Changes the Price and the Minimum
Price depends on quantity, size, material, printing and finishes, and falls as the quantity grows. A bigger flat pattern uses more board. Each added finish adds a step. A rigid box costs more than a folding carton because it is built by hand from thick board. Every product page shows a starting price per unit, and your quote shows the full price, with shipping included to the US and Canada. Taxes and duties are not included.
Minimum orders depend on the product, and each product page states its own. As a guide, most boxes start at 100 units, while rigid boxes and cardboard tubes have a low minimum. If you are launching, start with one structure and one finish, test it, then add complexity on the reorder.
Production takes 5 to 7 working days after artwork is approved and payment is received. Larger or more complex orders can take longer, and we confirm the date in your quote. Delivery time is added on top.
Common Mistakes
- Measuring the product without its cap or pump.
- Ordering the box before the insert is designed, so the inside height is wrong.
- Putting fine text or thin lines under foil or embossing.
- Leaving no panel space for the barcode, batch code or warnings.
- Choosing a rigid box for a product that will be shipped flat or in bulk.
- Judging color and finish only on a screen.
- Making environmental claims on the box that you cannot prove.
- Skipping a sample to save a week, then reprinting the whole run.
Checklist Before You Request a Quote
- The product, measured with its cap, and its weight.
- The inside size you want, in inches or millimeters.
- The structure you prefer, or a note on how it will be sold and shipped.
- Whether it needs an insert, and what should hold it.
- The finishes you like, and your brand colors (Pantone numbers if you have them).
- The text that must appear on the box.
- The quantity for the first run, and a likely reorder.
Related Guides
These guides go deeper on one product at a time: lipstick boxes, eyeshadow palette packaging and soap boxes. For bath products and candles, see our pages for bath bomb boxes and candle packaging.
Your Next Step
Tell us what you are packing, its size, how it will be sold and how many you need. We reply within 1 business day and offer free design support. You can get a free quote, try a free dieline template to see the flat pattern, or order the Standard Sample Kit to hold the options first.
Frequently Asked Questions
What is the best box for cosmetic products?
For most single products, a printed tuck box with a fitted insert is the best balance of cost, protection and print area. Choose a drawer or rigid box for gift sets and premium lines, and add a mailer or shipping box if the product ships by post.
What material is used for cosmetic boxes?
Most cosmetic cartons use white or brown kraft paperboard, typically 300 to 400gsm. Rigid boxes use thick board, 800 to 2000gsm, wrapped in printed paper. Mailers and shipping boxes use corrugated board. Tell us the product and we will recommend a board.
Do cosmetic boxes need an insert?
Not always. A tube or a light plastic bottle can sit in a snug tuck box without one. Glass bottles, jars, sets and anything heavy usually need an insert so they cannot move or knock against each other.
How do I size a cosmetic box?
Measure the product with its cap on, then add about 1/8 inch of clearance on each side and any insert height. Give us the inside size and say it is the inside size. See our measuring guide for the steps.
What must be printed on a cosmetic box?
It depends on the country. In the US it generally includes the product name, net contents, the company name and address, ingredients, and any directions or warnings. The brand is responsible for the text, so check current rules for each market and send us the final wording.
Can I order a small quantity of custom cosmetic boxes?
Yes. Minimums depend on the product: most boxes start at 100 units, and rigid boxes and cardboard tubes have a low minimum. Each product page states its own minimum, and we confirm it in your quote.
Can cosmetic packaging be recyclable?
Paper-based boxes can be recyclable where local facilities accept them, depending on the board, inks, coatings and glue. Plain paperboard without plastic film is generally the easiest. Recycled stock options are available on request.
Written by the PacksDo Team
We make custom printed packaging, from boxes and mailers to bags, labels and inserts. Questions about this guide? Ask us.